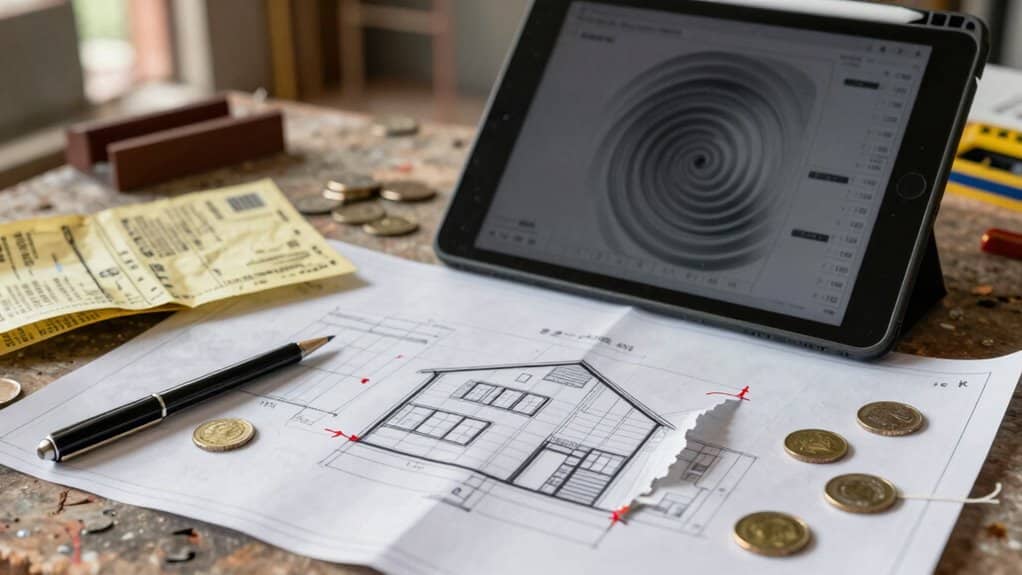
Hidden Remodeling Costs Homeowners Frequently Overlook
Hidden remodeling costs sneak in from several angles you might overlook. Expect structural assessments and temporary supports to protect against collapse, plus permit fees that can surprise your budget. Plumbing and electrical work can spike costs, especially if major overhauls or panel upgrades are needed. Don’t forget temporary housing, storage, and change orders—plus a prudent contingency for unforeseen issues. And ongoing maintenance after the project ends can quietly drain funds. If you keep exploring, you’ll uncover practical ways to plan ahead.
Unexpected Structural Issues That Inflate Renovation Budgets

Unexpected structural issues can quietly derail a renovation budget, turning a straightforward remodel into a major project when you least expect it.
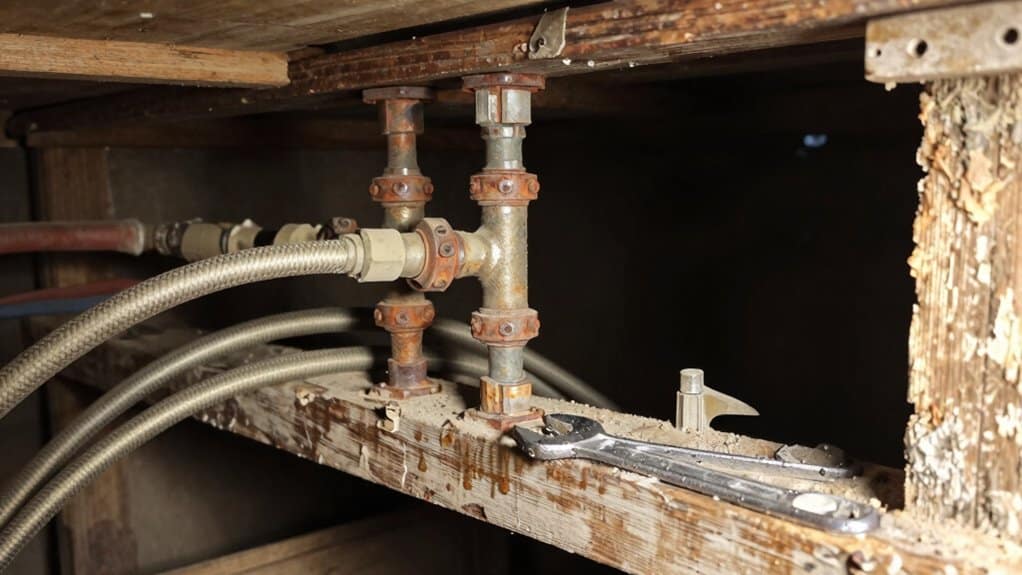
When you remove a load-bearing wall, you risk collapse if you skip proper support. You’ll need temporary beams or columns to redistribute weight, and if you ignore this, ceilings sag and walls crack.
When removing a load-bearing wall, don’t skip temporary support or you risk ceiling sag and wall cracks.
Structural assessments help catch problems before they snowball, and renovation inspections verify that engineers’ plans are correctly implemented.
Foundation cracks or settling pose another surprise: vertical cracks signal settling, horizontal ones indicate pressure issues. Repairs, like underpinning or pier installation, can cost thousands more.
Inadequate framing for new loads, especially in additions, demands reinforced joists or steel, raising costs. Regular assessments protect budgets and safety.
Retiling is essential for maintaining hygiene and functionality, and neglecting this update can also contribute to unexpected increases in renovation costs.
Hidden Code Compliance and Permitting Pitfalls
Hidden code compliance and permitting pitfalls can quietly derail a project if you don’t plan for them upfront. You’ll face permit pitfalls that can surprise you with fees, reviews, and hearings beyond the basic construction cost. Building, historic district, electrical, plumbing, and zoning permits each carry distinct fees that add up quickly, from hundreds to thousands of dollars. Compliance costs often extend beyond initial estimates as inspectors require upgrades or documentation to meet current standards. You may discover outdated systems or materials during inspections, triggering unplanned work and delays. Early coordination with local authorities helps you anticipate requirements, avoid stop-work orders, and reduce last-minute surprises. It is crucial to ensure that your contractor has the necessary licensing and legal compliance to avoid legal risks and potential project setbacks.
Plumbing and Electrical Surprises That Drive Costs up
Many remodeling projects hit a snag when plumbing and electrical work reveals itself as more costly than expected.
Many remodels surprise you when plumbing and electrical costs climb higher than expected.
You’ll often face plumbing surprises that push budgets higher, from minor fixes at 150–350 dollars to major overhauls like full re-plumbing or main sewer work that can reach 2,000–15,000.
Electrical upgrades follow a similar arc: basic repairs stay under 400 dollars, but panel upgrades or new circuits run 500–2,000, with older homes needing more substantial safety updates.
In bathrooms, intensive plumbing work can lift typical remodel costs, while standard full bath projects commonly land in the 12,000–25,000 range.
Labor cost increases, 3.4% year over year, amplify these figures, so plan for steady, informed decisions and budget cushions for plumbing surprises and electrical upgrades.
Before starting a remodel, it is crucial to obtain detailed estimates from contractors to help mitigate unexpected expenses and align budget expectations with the project's scope.
The True Price of Temporary Housing and Living Disruptions
Temporary housing and living disruptions during a major remodel can quietly become one of the project’s biggest temptations to underestimate. When a renovation stretches 2–3 months, you’ll likely face temporary housing costs that quietly add up.
In Denver, expect monthly rents around $1,700 for a one-bedroom, with total housing bills for the period ranging from about $3,400 to $5,100. If you opt for extended-stay hotels, costs can run from $4,000 to $6,000 per month.
Add storage and moving, and expenses climb by thousands more. You’ll also encounter higher daily living costs and meal-service options that replace home cooking.
Plan for furnishing temporary spaces, meanwhile, as initial investments can be substantial. A proactive budget reduces stress and unexpected financial strain.
Change Orders and Contingencies: Why Budgets Spiral
Change orders and contingencies aren’t rare annoyances; they’re real drivers of budget growth you’ll see from the first bid to the final bill.
As you track changes, you’ll notice discretionary vs. non-discretionary shifts each add about 4% to 8% of costs, and overall averages often swing 10% to 25% higher than the original plan.
Change Order Realities
Change orders and contingencies are a real driver of budget spirals in construction projects. You’ll see change orders average about 10% of the total contract value, with some projects hitting 25%.
Major builds commonly run 10 to 15% in change order terms, while contract modifications of 5 to 10% are expected in many endeavors.
On residential work, projects priced 250K–500K average 6.3 change orders, more than double those under 250K, and higher-priced homes over 500K use more orders too, though the growth slows.
Change order impacts include delayed processing, pricing gaps, and cascading costs to later phases.
To avoid financial strain, it's crucial to allocate budget for unexpected expenses during the initial planning phase, ensuring that you can accommodate these potential changes without compromising your project.
Contingency Necessities
Contingency planning is essential because budgets rarely stay perfectly on track once a remodeling project begins. You’ll use a contingency percentage to cover surprises, from site conditions to price shifts.
The standard range is 5% to 15% of the total budget, with higher-risk projects needing 10% to 20% and larger loans sometimes requiring 20% to 30%. This isn’t extra money for frivolous changes—it’s protection against real risks identified in a risk assessment.
Budget forecasting should allocate contingencies across components, such as kitchens, bathrooms, and structural work, while considering project complexity. A dedicated team with over 35 years of experience can ensure stress-free remodeling and help you manage these contingencies effectively.
Remember that 1 in 3 renovations overrun their costs, so maintain disciplined tracking and update figures as design details firm up. This approach supports steady progress and informed decision-making.
Inspection Gaps: The Hidden Costs of Mold and Water Damage
Hidden remodeling costs often hide in plain sight, because mold and water damage can linger behind walls long after a home inspection seems complete.
When you plan renovations, you’ll want to evaluate mold inspection and water damage risks that aren’t always obvious.
Costs vary: a typical mold inspection runs about $300-$400 for smaller homes, with national averages higher, and on-site testing adding $250-$500 plus lab analysis.
Invasive techniques raise prices, and more samples boost the bill.
Remember that hidden water intrusion can mask mold spread, so accurate testing matters.
A thorough inspection reduces future surprises, yet remember that some cases require follow-up remediation, which can range from a few hundred to several thousand dollars.
Prioritize professional oversight to avoid conflicts.
Long-Term Maintenance Hidden Costs After a Remodel

As you plan a remodel, you’ll want to contemplate the long-term maintenance costs that quietly mount after the project wraps up. Ongoing upkeep, hidden long-term repairs, and regular upkeep expenses can strain budgets just as much as the initial construction costs, so identifying them early helps you stay prepared. It's crucial to consider contingency funds for unexpected issues like mold repair that might arise during or after the remodeling process.
Ongoing Maintenance Costs
Ongoing maintenance costs after a remodel quietly accumulate as homes age and systems wear in. You’ll notice these expenses grow with time because labor and material prices stay high, and aging components demand frequent attention. Ongoing maintenance, not just big upgrades, drains budgets when unexpected wear shows up. Hidden expenses include steady replacements for aging roofs, windows, and mechanicals, along with routine servicing that prevents major failures. With labor shortages pushing costs higher, even small fixes can feel like sizable surprises. Regular maintenance of kitchen cabinets and drawers can prevent the need for costly replacements down the line. By planning for regular upkeep, you can spread costs and avoid debt from sudden repairs. Track seasonal needs, prioritize safety-critical items, and set aside a maintenance fund to keep your home reliable, efficient, and comfortable over the long term.
Hidden Long-Term Repairs
Long-term repairs after a remodel can quietly reshape your budget, even when the big projects seem finished. You’ll uncover hidden needs as structures settle, and these costs can linger long after construction ends.
Prioritize long term inspections and structural assessments to catch issues early, before they escalate into major expenses. You may face foundational challenges, water damage, or pests that weren’t obvious at first glance, especially in older homes.
Planning for contingencies helps you avoid surprises when the bill arrives. By staying proactive, you preserve safety and value, rather than reacting to costly breakdowns. With careful monitoring, you reduce the chance of sudden shutdowns or inconvenient repairs disrupting daily life.
- Structural assessments reveal hidden risks before they grow
- Long term inspections identify moisture and mold threats
- Foundation checks catch settlement早
- Pest assessments prevent unseen damage
- Proactive findings guide budget-aware decisions
Regular Upkeep Expenses
Regular upkeep expenses after a remodel can quietly accumulate, especially as your home ages and labor costs rise. You’ll notice regular service needs emerge—often tied to aging systems and frequent wear.
Routine inspections help you spot small issues before they become costly failures, and they align with rising repair costs driven by labor inflation. As projects age, labor remains a dominant share of expenses, so budgeting for ongoing maintenance is smart.
Your 42-year-old home and many pre-1980 structures mean more frequent checks on windows, roofing, HVAC, and doors. Expect steady maintenance spending, with continued demand for routine updates.
Wrapping It Up
You’ll finish with a clearer picture of renovation costs and what really drives them. By spotting hidden issues early, you can avoid surprises and keep projects on track. Stay proactive with inspections, permits, and contingencies, and communicate openly with your team. Remember that maintenance matters long after the remodel, so plan for ongoing care. With careful budgeting and realistic expectations, you’ll restore and refresh spaces confidently while minimizing disruptions and stress. Your informed approach makes the difference.
ROI of Remodeling Projects: What Adds the Most Value to Your Home
Exterior upgrades yield the strongest home-value returns, especially a high-quality garage door and durable siding. A stylish garage door often tops ROI lists, with 194% in 2024 and up to 268% in 2025, while fiber-cement or vinyl siding recoups most costs and boosts curb appeal. Pair these with energy-efficient windows, solid entry doors, and even stone veneer where appropriate. Minor kitchen updates also help. If you keep exploring, you’ll uncover more strategies and concrete costs.
Cost-Effectiveness of Exterior Upgrades: Doors, Siding, and Stone Veneer
Exterior upgrades like doors, siding, and stone veneer offer strong returns by boosting curb appeal and home value.
When you consider cost-effectiveness, you’ll find fiber-cement siding replacement yields the highest ROI at 113.7%, while vinyl siding recoups 96.5%.
If you’re aiming for standout value, manufactured stone veneer shines with a 207.9% ROI, and regional data in the DMV shows about 94% ROI for stone veneer on a $10,000 project, adding roughly $9,400 in value.
For broader choices, siding options vary, yet exterior upgrades generally return 60-90% of costs.
You gain not only aesthetics but improved durability and energy efficiency.
Stone veneer and siding options both contribute greatly to resale value, guiding your decision toward impactful, cost-conscious improvements.
Additionally, energy-efficient window and door updates can lead to annual savings of up to $465, making them a smart investment for boosting property value and reducing utility costs.
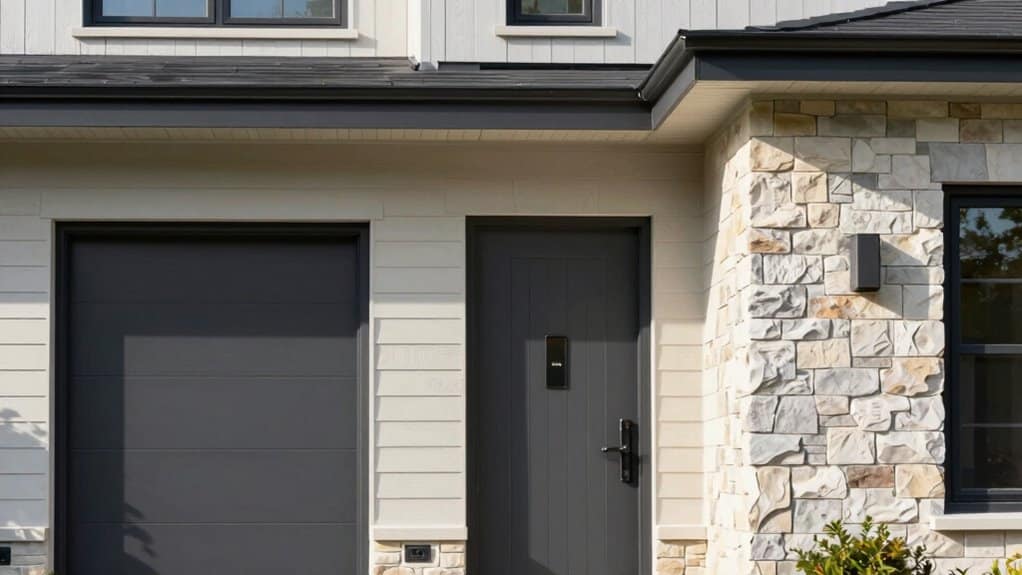
The Big ROI Drivers: Garage Doors and Entry Doors That Sell
Garage doors and entry doors are standout value leaders, delivering strong ROI and boosting curb appeal in a single upgrade.
You’ll notice faster sales, higher energy efficiency, and a clearer path to recouping your investment, with garage doors often leading ROI in multiple studies.
As you explore these doors, focus on the value they add to both aesthetics and resale potential, aligning with the goal of selling faster and smarter.
Door Value Leaders
Numbers aren’t just trivia here—they signal a clear trend: doors sold as value drivers deliver outsized ROI. When you consider garage and entry doors together, you’re looking at top-tier returns that outpace many other projects.
The data show remarkable regional strength and steady cost efficiency, making this a smart focus for value. Think about how door design and materials influence both curb appeal and performance. Modern options can lift list price by about 1–4%, while enduring materials guarantee long-term value.
Enhanced security adds peace of mind buyers notice. With ROI persisting upward—from 102.7% in 2023 to 268% nationally in 2025—the case for upgrading doors is compelling and practical.
- ROI leaders: garage doors and entry doors as prime value drivers
- Emphasis on door design and door materials choices
- Security and weather performance boost perceived value
- Cost efficiency supports strong resale impact
- Regional gains reinforce broad applicability
To further enhance curb appeal and performance, consider incorporating outdoor lighting and pathway designs that complement the home's architecture.
Curb Appeal Boost
You’ve seen how doors can drive strong value, and now the spotlight shifts to curb appeal—the first impression that sets the tone for a home sale.
Curb appeal matters because visually impactful changes are perceived as high-value by buyers, helping your home stand out. A new garage door boosts overall curb appeal and delivers the highest ROI, with ROI numbers climbing into the 190s to 270% range in recent reports.
An upgraded entry door complements this look, adding solid value at comparatively low cost. Together, these updates shape value perception and can accelerate offers.
The typical garage door cost sits around $4,500, while a steel entry door averages about $2,355, making curb appeal upgrades efficient, influential, and financially prudent.
ROI Spotlight: Doors
Curious how a front-facing upgrade can reshape your home's value? Doors dramatically influence curb appeal and resale outcomes, with garage and entry doors delivering standout ROI.
In 2024, garage door replacements averaged 194% ROI, rising to 268% in 2025, topping many projects. Entry doors, especially steel, reached 188% ROI in 2024, and some regions see profits over 315%.
These upgrades cost less than most exterior improvements while delivering strong returns, and they often outpace kitchens or baths. Beyond price, new doors enhance door security and energy efficiency, reducing heat transfer and boosting resale value.
Local data show regional gains, with notable ROI in Chicago and Pacific regions. Consider door security, energy efficiency, and overall functionality when planning your next upgrade.
Furthermore, modern appliances in the kitchen can significantly enhance buyer perception, creating a welcoming environment for new owners.
- High ROI drivers: garage doors and entry doors
- Lower cost, higher value than many remodels
- Regional variations to watch
- Energy efficiency boosts resale value
- Enhanced security adds peace of mind
Siding and Windows: Balancing Curb Appeal With Value
Siding and window upgrades are prime examples of balancing curb appeal with value, because the right choices deliver both a striking first impression and solid resale gains. You’ll find vinyl siding offers a solid 70–75% ROI, with regional averages around 70%, while fiber cement siding can reach about 88.4% nationally. Both protect against moisture and reduce future repair costs, yet siding often delivers the strongest visual impact for buyers, boosting curb appeal. Window replacement yields 60–70% ROI, with vinyl windows around 67.1% and wood around 66% regionally, delivering energy efficiency and a noticeable appearance upgrade. Prioritize based on resale goals, energy savings, and market competition; consider siding aesthetics and window efficiency as linked contributors to overall value. For homeowners in San Diego, outdoor additions such as pergolas and backyard decks can also enhance both home value and outdoor usability.
Inside Scoop: Minor Kitchen Remodels That Pay Back
Minor kitchen remodels can be a smart investment when you’re selling a home, because small, well-chosen changes often deliver strong returns without the upheaval of a full renovation.
You’ll see ROI rise when you focus on practical updates that buyers notice, like refreshed cabinets, new appliances, and better lighting. National and Chicago data show solid paybacks, with high-ROI upgrades guiding how you spend.
With kitchen trends leaning toward efficiency and style, careful choices stay affordable while boosting value. Consider how remodeling tips can maximize appeal without overdoing it.
Your goal is a balanced, modern look that feels fresh and functional. A key area to focus on is the value of kitchen remodels which not only enhances aesthetics but also adds significant property value.
- Cabinet refacing
- Energy-efficient appliances
- Quartz or granite countertops
- Improved lighting
- Tile backsplash
Material Choices That Maximize Resale Value
When you choose exterior upgrades, you’ll see how durable siding, energy-efficient windows, and strong entry doors each influence resale value. This matters because fiber cement siding, efficient windows, and modern doors consistently deliver solid ROI and curb appeal that buyers notice. Additionally, upgrading to architectural shingles enhances both style and durability, offering a lifespan of 20-30 years and reducing the need for frequent replacements.
Exterior Upgrades ROI
Exterior upgrades can greatly influence resale value, and choosing the right materials makes a measurable difference. You’ll see strong ROI from upgrades like garage doors, steel entry doors, and stone veneer, with notable impact on curb appeal and durability.
When selecting exterior materials, prioritize value-driven choices that balance aesthetics, cost, and performance. Sustainable materials and well-designed landscaping enhancements can amplify overall appeal and energy efficiency, while remaining mindful of regional preferences and resale expectations.
Consider how each option stands up to weather, maintenance, and security concerns, because longevity translates to higher perceived value. Informed decisions today help maximize your home’s market position and homeowner satisfaction tomorrow.
- Garage Door Replacement tops visible transformation with high ROI
- Steel Entry Door boosts security, energy efficiency, curb appeal
- Manufactured Stone Veneer delivers dramatic visual impact
- Fiber-Cement Siding Replacement offers durability and value
- Entry Door Alternatives (Fiberglass) provide weather resistance and customization
For roofing, asphalt shingles are a cost-effective choice that also offer fire resistance, making them a preferred option in regions like California.
Durable Siding Options
Durable siding options matter because the right choice can boost curb appeal while withstanding weather and time.
When you choose fiber cement, you gain strong ROI and long life, often 50+ years with proper maintenance, plus design flexibility that mimics wood or stucco without the upkeep.
Vinyl siding offers affordability, with 70% to 97% cost recapture at resale and 20 to 30-year lifespans, removing painting requirements but requiring periodic replacement.
Engineered wood provides upscale look at a middle price point, delivering aesthetic value with lower maintenance than traditional wood.
Steel siding adds durability and low maintenance, reinforcing value through long-term performance.
Consider the balance of siding materials and maintenance requirements to maximize resale value.
Energy-Efficient Windows Value
Energy-efficient windows can boost resale value while trimming ongoing costs, so choosing the right materials matters as much as the upgrade itself. You’ll see solid ROI from vinyl or wood, with general window replacement ROI around 60-70% and national averages near 70-80%.
Energy savings enhance appeal, since Energy Star windows cut utility bills and often reduce energy use by up to 30%. Features like double- or triple-pane glass, Low-E coatings, and gas fills boost efficiency while lowering maintenance burdens.
As you compare options, remember energy savings and buyer appeal drive quicker sales and higher offers. Ultimately, energy-efficient choices help your home feel newer and more comfortable, attracting buyers who recognize long-term value.
- Energy savings and buyer appeal
- Curb appeal from upgraded aesthetics
- Reduced drafts and better noise insulation
- Fewer maintenance concerns for buyers
- Higher perceived value in competitive markets
Practical Guide to Prioritizing Remodeling Projects for Highest Returns
To prioritize remodeling projects for the highest returns, start by focusing on the items that consistently deliver the strongest cost recovery and resale boosts.
Exterior upgrades top the list, with garage door replacements delivering the highest ROI and steel door replacements close behind, making them powerful early bets.
If you want substantial value, consider manufactured stone veneer, though it carries a higher upfront cost.
For ongoing value, fiber-cement or vinyl siding recoups most of its price at resale and outdoor improvements, such as landscaping improvements and outdoor amenities, support broad appeal.
Mid-range kitchen and bathroom updates also perform well, especially minor kitchen remodels and midrange baths.
When planning, balance outdoor living space expansions and durable exterior work to maximize overall ROI across markets.
Wrapping It Up
You’ll get the most value by prioritizing projects with proven returns, like entry and garage doors, sturdy siding, and energy-efficient windows. Consider minor kitchen updates and smart material choices that boost resale appeal without breaking the bank. Balance curb appeal with durable, cost-effective options, and align projects with your home’s style. Plan carefully, track costs, and focus on improvements that buyers notice first. With a thoughtful approach, you’ll maximize value while preserving your budget and timeline.
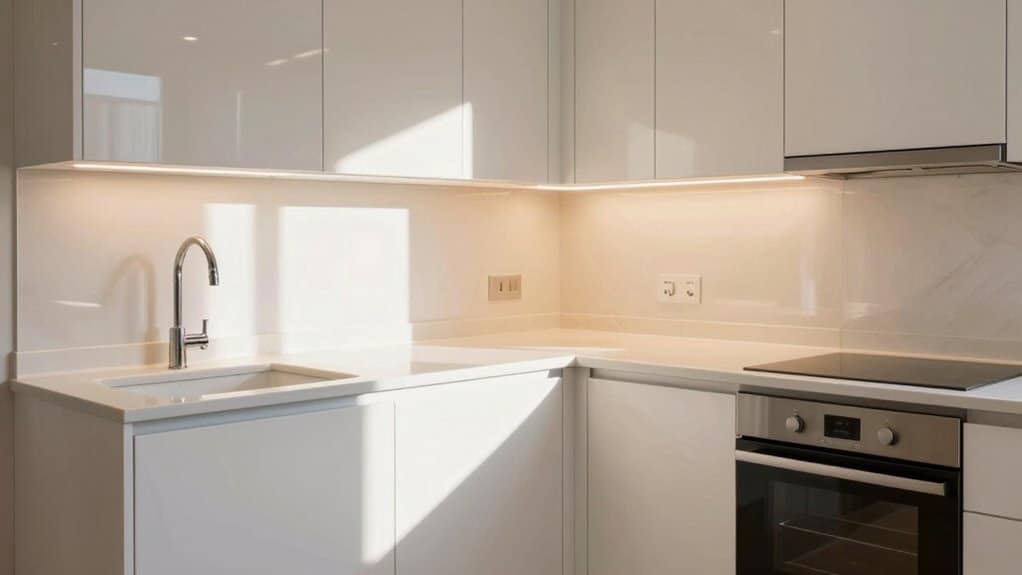
Space-Saving Kitchen Ideas
Transform your cramped kitchen with smart vertical storage solutions like adjustable shelf brackets, wall hooks, and magnetic strips that maximize unused wall space. You'll gain efficiency through multi-functional kitchen islands with retractable seating and clever cabinet organizers like roll-out drawers and door-mounted racks. Space-saving appliances and corner storage solutions help optimize every square inch. These proven strategies will open up possibilities you never imagined for your kitchen's potential.
Vertical Storage Solutions to Maximize Wall Space

When space is at a premium in your kitchen, vertical storage solutions offer a smart way to utilize every inch of available wall space.
You'll find that installing adjustable shelf brackets creates customizable storage areas for cookbooks, small appliances, and decorative items. Consider mounting a series of wall hooks to hang frequently used utensils, pots, and pans, keeping them within easy reach while freeing up valuable cabinet space.
Transform empty wall sections into functional storage zones by incorporating floating shelves or mounting a pegboard system. You can organize spices, cooking oils, and dried goods on these vertical surfaces, making them easily accessible during meal preparation. Additionally, utilizing hidden storage compartments can help maintain a clean, minimalistic kitchen look while maximizing your storage potential.
Don't forget to maximize the space above your cabinets, where you can store seasonal items or display attractive cookware that you don't use daily.
Multi-Functional Kitchen Islands and Carts
Multi-functional kitchen islands and carts offer ingenious solutions for maximizing space while adding versatility to your kitchen setup.
You'll find that mobile kitchen carts provide excellent flexibility, allowing you to create additional counter space when needed and easily store them away when you don't. These units often include shelving, drawers, and hooks for enhanced storage capabilities.
For permanent solutions, consider installing a kitchen island with retractable seating solutions that tuck neatly underneath when not in use.
You can incorporate features like pull-out cutting boards, hidden trash bins, and fold-down table extensions to maximize kitchen cart versatility. Many modern islands also include power outlets, making them perfect for small appliances and creating an efficient workspace that adapts to your changing needs. Additionally, custom-designed islands offer multifunctional storage and extra prep space, enhancing both functionality and style in your kitchen.
Clever Cabinet Organization Tips
You'll maximize your cabinet space with roll-out drawer systems that bring items from the back within easy reach.
Custom drawer dividers help you create designated spots for utensils, cooking tools, and small appliances, keeping everything neatly organized and readily accessible.
Vertical storage solutions, such as cabinet-door mounted racks and pull-out pantry systems, transform unused spaces into practical storage areas for cutting boards, baking sheets, and pantry items. Custom cabinets can further enhance your kitchen's functionality by providing tailored storage options that fit your specific needs.
Roll-Out Drawer Systems
Roll-out drawer systems transform ordinary cabinets into highly efficient storage spaces that maximize every inch of your kitchen.
These innovative systems make it easy to access items stored in the back of deep cabinets, eliminating the need to kneel down and reach blindly for your cookware or supplies.
You'll find that drawer accessories like dividers, bins, and organizers enhance your space optimization efforts, creating designated spots for everything from utensils to pot lids.
Install roll-out systems in both upper and lower cabinets to double your accessible storage space.
The smooth-gliding mechanisms guarantee that even heavy items like mixers and food processors are within easy reach.
Consider adding specialized features such as spice rack pull-outs or vertical dividers for baking sheets to customize your storage solution.
Additionally, using compact appliances alongside roll-out drawer systems can further improve space efficiency in your kitchen.
Custom Drawer Dividers
Custom drawer dividers transform cluttered kitchen drawers into orderly storage spaces that keep your utensils, gadgets, and tools neatly organized.
You'll find that these dividers maximize every inch of drawer space while maintaining drawer aesthetics that complement your kitchen's design.
Create personalized compartments using custom materials like wood, acrylic, or bamboo to fit your specific items perfectly.
You can adjust the divider sections to accommodate everything from large serving spoons to tiny measuring spoons.
When you're planning your divider layout, consider grouping similar items together and measuring your most-used tools to guarantee they'll fit comfortably.
Don't forget to leave room for future additions to your kitchen collection. Additionally, kitchen islands can further enhance your storage options and overall kitchen functionality.
With proper organization, you'll spend less time searching for items and more time enjoying your cooking experience.
Vertical Storage Solutions
When kitchen cabinets extend from floor to ceiling, vertical storage solutions maximize every inch of available space while keeping cookware and pantry items easily accessible.
You'll find that shelf layering creates multiple levels within tall cabinets, perfect for storing different-sized items without wasting vertical space.
Make the most of your cabinet height by implementing basket stacking systems that let you organize items by category while maintaining easy access.
Install pull-down shelving units in upper cabinets, bringing those hard-to-reach items right to your fingertips.
Consider adding vertical dividers for storing baking sheets, cutting boards, and serving platters upright, eliminating the need to stack them horizontally.
Door-mounted racks and adjustable shelf risers help you customize the space to fit your specific storage needs while maintaining an organized, efficient kitchen layout.
Space-Efficient Appliance Selection

Choosing built-in appliances for your kitchen can dramatically increase your available counter and floor space while creating a sleek, integrated look.
You'll find that slim-profile models, from refrigerators to dishwashers, offer nearly identical functionality to their full-sized counterparts while taking up considerably less room.
These space-efficient options not only help you maximize your kitchen's potential but also often come with modern features that can enhance your cooking and food storage capabilities.
Built-In Small Appliances
Built-in small appliances represent a clever solution for maximizing kitchen space while maintaining functionality.
You'll find that integrated appliance designs can transform your kitchen's efficiency by incorporating microwaves, coffee makers, and wine coolers directly into your cabinetry or wall spaces.
When you're exploring compact appliance options, consider built-in models that seamlessly blend with your kitchen's architecture.
These space-saving solutions include under-cabinet microwaves, drawer-style dishwashers, and slim-profile refrigerators.
You can optimize vertical space by installing wall-mounted coffee stations or pull-out mixer lifts that hide away when not in use.
The key advantage of built-in appliances is their ability to preserve counter space while keeping essential tools readily accessible.
This approach creates a streamlined look while ensuring your kitchen remains both functional and clutter-free.
Slim Profile Model Benefits
Slim profile appliances deliver remarkable space efficiency while maintaining full functionality in compact kitchens.
You'll find that these streamlined models can reduce your appliance footprint by up to 30% compared to standard sizes, making them ideal for urban living spaces. From refrigerators to dishwashers, slim appliances integrate seamlessly with compact furniture to maximize your available square footage.
When selecting slim appliances, you'll benefit from their versatile installation options and modern energy efficiency features.
These space-conscious models often include innovative storage solutions, like adjustable shelving and multi-purpose compartments, that help you make the most of their reduced dimensions.
Hidden Storage Opportunities

When space is at a premium, your kitchen's hidden storage potential can transform its functionality. You'll find countless opportunities to maximize space by incorporating hidden compartments and secret cabinets throughout your kitchen.
Consider installing toe-kick drawers beneath your base cabinets or utilizing the empty space behind your backsplash for slim storage panels. Transform your cabinet end panels into pull-out spice racks, and don't overlook the vertical space above your upper cabinets for concealed storage bins.
You can also retrofit existing cabinets with pull-out organizers that make corner spaces more accessible. Install sliding panels in your island to hide small appliances, or add a flip-up countertop section that reveals additional storage below.
These clever solutions help you maintain a clean, uncluttered look while maximizing every inch of available space.
Magnetic and Wall-Mounted Tools
You'll find that magnetic knife strips offer an elegant solution for storing your kitchen knives while keeping them within easy reach and freeing up valuable counter space.
Wall-mounted tool organizers let you display your most-used utensils as functional art pieces, transforming your kitchen walls into practical storage zones.
Knife Magnet Storage Solutions
Magnetic knife strips offer a brilliant space-saving solution that transforms your kitchen walls into functional storage areas.
These knife block alternatives keep your essential cutting tools within easy reach while freeing up valuable counter space. You'll find that magnetic strips provide better visibility of your knife collection and make selecting the right blade quick and efficient.
When installing your magnetic knife strip, choose a location that's convenient but away from high-traffic areas.
You'll want to mount it at eye level for easy access and guarantee it's securely fastened to the wall. Modern magnetic strips come in various finishes, from sleek stainless steel to warm wooden designs, allowing you to match your kitchen's aesthetic while maintaining a professional look.
Remember to position knives with their handles facing the same direction for a clean, organized appearance.
Creative Tool Organization Tips
Transforming kitchen walls into functional storage spaces extends beyond knife organization to include various cooking tools and utensils.
You'll find that creative tool racks can turn cluttered drawers into organized displays while freeing up valuable counter space. Install magnetic strips or rails to hold metal spatulas, tongs, and measuring spoons, making them easily accessible during meal preparation.
Consider innovative storage ideas like pegboards with adjustable hooks, which let you customize your tool arrangement based on your cooking needs. You can group items by function or frequency of use, creating an efficient workflow in your kitchen.
Wall-mounted racks with slots or hooks work particularly well for larger utensils and often become attractive design elements. These solutions don't just save space - they'll help you maintain an organized kitchen while keeping essential tools within arm's reach.
Smart Corner Storage Solutions
The often-neglected corner spaces in your kitchen hold untapped potential for maximizing storage efficiency. By installing corner shelving units, you'll transform these awkward angles into valuable storage areas for your cookware, small appliances, and pantry items.
Consider adding rotating spice racks to make seasonings easily accessible while cooking. You'll find that L-shaped pull-out drawers can maximize those deep corner cabinets, giving you full access to items that might otherwise get lost in the back.
Installing a lazy Susan system lets you utilize every inch of corner space while keeping items organized and within reach. For upper corners, try diagonal cabinets with adjustable shelves that accommodate items of different heights.
These smart solutions don't just save space - they'll make your kitchen more functional and enjoyable to use.
Compact Dining and Food Prep Areas
When space is at a premium, creating functional dining and food prep areas requires clever planning and versatile solutions.
You'll find that a well-designed dining nook can serve multiple purposes, doubling as a cozy spot for meals and an efficient workspace for daily tasks. Consider installing a fold-down table that you can tuck away when not in use, or opt for a built-in bench with hidden storage underneath.
Your prep station doesn't need to be extensive to be effective. You can maximize counter space by using multi-tiered organizers and wall-mounted storage solutions.
Installing a mobile kitchen island gives you flexibility, as you'll be able to roll it where needed for food prep and push it aside when you want more floor space.
Consider adding slim pull-out pantry units that utilize narrow spaces effectively.
Fold-Down and Pull-Out Features
Building on smart storage solutions, fold-down and pull-out features add remarkable functionality to compact kitchens.
You'll maximize your space by installing foldable tables that mount directly to the wall, providing an instant workspace when needed and disappearing when not in use. Retractable shelves offer similar benefits, sliding smoothly from cabinets to display your spices, utensils, or small appliances.
Consider adding pull-out cutting boards near your sink or stovetop for easy food preparation. You can also incorporate a hidden step stool that slides beneath your cabinets, making upper storage areas more accessible.
When selecting these features, focus on durability and smooth operation - you'll want mechanisms that can withstand daily use while maintaining their space-saving benefits.
These adaptable elements transform your kitchen into a more efficient workspace.
Kitchen Decluttering Strategies
Effective decluttering starts with a systematic approach to organizing your kitchen essentials. You'll want to implement proven kitchen minimalism strategies by first categorizing items based on frequency of use.
Store daily-use items within easy reach while relocating seasonal or occasional items to upper cabinets or secondary storage areas.
To maintain decluttered countertop tips, establish designated zones for appliances and create a "one in, one out" rule when acquiring new kitchen tools.
You'll find it helpful to use clear containers for pantry items, making it easier to track inventory and reduce unnecessary purchases.
Consider installing drawer dividers and cabinet organizers to maximize vertical space, and regularly evaluate your kitchen items to confirm you're keeping only what you truly need and use frequently.
Conclusion
Just as a master gardener transforms a small plot into a thriving oasis, you'll find that implementing these space-saving kitchen ideas can turn your compact kitchen into an efficient culinary command center. You're not just organizing a room; you're crafting a well-orchestrated symphony where every inch serves a purpose. By adopting these strategic solutions, you'll discover that even the smallest kitchen can flourish into a highly functional space.
Kitchen Countertop Selection
Choosing your ideal kitchen countertop depends on balancing durability, maintenance needs, and budget with your lifestyle requirements. Popular materials like quartz offer exceptional durability and low maintenance, while granite provides heat resistance and natural beauty. You'll want to take into account factors like scratch resistance, staining potential, and cleaning requirements alongside your cooking habits and entertainment needs. Budget-friendly options like laminate can provide style without breaking the bank, while premium materials like marble offer elegant, distinctive veining. Installation costs typically account for 10-11% of your total kitchen remodel budget. Exploring each material's unique characteristics will help you make the most informed decision for your space.
Popular Kitchen Countertop Materials

Modern kitchens showcase a diverse range of countertop materials to suit different budgets and styles.
Today's kitchen trends emphasize both functionality and aesthetics, with quartz leading the way as a popular choice due to its durability and low maintenance requirements. You'll find that countertop innovation has made materials like granite and concrete increasingly accessible, offering unique design possibilities for your space.
If you're looking for luxury, dolomite and marble present elegant options with distinctive veining patterns, though they'll require more maintenance.
For budget-conscious homeowners, laminate provides an affordable alternative without sacrificing style. As you explore these options, you'll notice that each material brings its own character to your kitchen, from the natural beauty of granite to the customizable nature of concrete, allowing you to match your countertop to your specific needs and design preferences. Consider how your choice of cabinet styles can complement your selected countertop material for a cohesive look in your kitchen.
Durability and Longevity Factors
While selecting a kitchen countertop, durability and longevity often become the deciding factors that influence your final choice.
When you're comparing material durability ratings, you'll find that natural stones like granite and quartz can last over 100 years with proper care, while concrete typically lasts about 50 years. Each material offers distinct advantages regarding durability factors.
You'll want to take into account how different materials handle daily wear and tear. Granite and quartz excel in scratch resistance, but granite requires annual sealing to maintain its stain resistance, while quartz doesn't.
Heat resistance varies greatly - granite and tile can withstand high temperatures, but quartz has limitations above 300°F.
For outdoor kitchens, granite's your best bet since it won't fade in sunlight like quartz can.
Budget Planning for Kitchen Counters

Three key financial factors shape your kitchen countertop budget: material costs, installation expenses, and overall project scope. Understanding these elements will help you make cost-efficient decisions while staying within your budget constraints.
For an average kitchen remodel, you'll want to allocate about 10-11% of your total budget to countertops. If you're working with limited funds, you might evaluate laminate at $20-50 per square foot, while those seeking luxury can opt for marble at $125-250 per square foot.
Don't forget to factor in installation costs, especially if you're planning custom cuts or unique shapes. You'll also need to assess whether your existing cabinets can support your chosen material, as modifications might be necessary, particularly with heavier options like concrete or full-height quartz installations. Additionally, consider how your countertop choice impacts kitchen functionality and overall home appeal.
Design Elements and Color Options
When selecting your kitchen countertop, you'll want to contemplate how patterns and textures can dramatically influence your space, from subtle veining in marble to bold, speckled designs in granite.
You can choose between natural materials that offer unique, one-of-a-kind appearances or engineered options that provide consistent, predictable patterns to match your design vision.
Your color selection should coordinate with your kitchen's existing elements, including cabinets and backsplash, while reflecting the amount of natural light in your space and your maintenance preferences. Additionally, consider how countertop materials can impact your kitchen's overall ambiance and usability.
Pattern and Texture Choices
Selecting the right pattern and texture for your kitchen countertop can dramatically influence your space's overall aesthetic appeal.
When exploring pattern combinations, you'll find that veined patterns add luxurious elegance, while consistent patterns create a more contemporary feel. The interplay of texture contrasts can transform your kitchen from ordinary to extraordinary.
You'll want to take into account how different finishes affect both appearance and functionality. High-polished surfaces deliver a modern, reflective look that's perfect for contemporary spaces, while honed or leathered finishes offer a more subtle, sophisticated appearance with practical benefits like reduced glare.
If you're looking to make a bold statement, consider incorporating waterfall edges or decorative edge profiles. These design elements can enhance your countertop's visual impact while maintaining its practicality. Additionally, choosing materials such as quartz, granite, and butcher block can significantly elevate both aesthetics and durability in your kitchen design.
Natural vs. Artificial Looks
Whether you're drawn to the timeless allure of natural stone or the versatility of artificial materials, your countertop choice sets the foundation for your kitchen's aesthetic.
Natural stone offers unique texture variations that can't be replicated, showcasing nature's artistry through distinctive patterns and organic characteristics. However, it requires more maintenance and comes with certain design limitations.
Artificial materials present a different set of advantages that might better align with your aesthetic preferences.
You'll find endless color options, consistent patterns, and enhanced durability. These engineered surfaces offer excellent resistance to stains and scratches while requiring minimal upkeep.
While they may lack the one-of-a-kind charm of natural stone, they compensate with superior practicality and design flexibility, allowing you to achieve your desired look without compromising on functionality. Additionally, opting for cost-effective remodeling options can help you refresh your kitchen without breaking the bank.
Color Coordination Elements
The art of color coordination transforms your kitchen from a mere functional space into a cohesive design masterpiece. Understanding color psychology and creating color harmony between your countertops, cabinets, and backsplash is essential for achieving a balanced look.
You'll want to reflect on how different elements work together, from selecting complementary countertop materials to incorporating accent colors through accessories and greenery.
When choosing your countertop color, start by evaluating your cabinet shades and existing color palette. If you've got light cabinets, you might opt for darker countertops to create striking contrast, or stick with neutral tones for a timeless appeal.
Don't forget to factor in your lighting situation, as it greatly affects how colors appear throughout the day. Think about incorporating texture through materials like granite or quartz to add visual interest while maintaining practical functionality.
Lifestyle Impact on Material Choice

When choosing a kitchen countertop, your daily habits and routines play an essential role in determining the most suitable material.
If your family cooking style involves frequent meal preparation and heavy use, you'll want to evaluate durable materials like granite or quartz that can withstand high temperatures and resist scratches. Your entertaining styles also influence the choice - if you often host gatherings, you might prefer materials that are easy to clean and maintain.
For busy households with active family life, quartz offers an ideal solution with its non-porous surface that doesn't require sealing.
If you're environmentally conscious, you can explore sustainable options like recycled glass or bamboo.
Those working with a tighter budget don't need to compromise on style, as materials like laminate can provide both affordability and aesthetic appeal.
Maintenance Requirements and Tips
When you're selecting your kitchen countertops, it's essential to understand the daily maintenance routines you'll need to follow for ideal care.
Your countertop's longevity directly depends on following proper sealing schedules, which vary from annual treatments for natural stone to minimal requirements for engineered materials like quartz.
You'll also want to implement long-term protection strategies, such as using cutting boards and trivets, while maintaining a consistent cleaning routine with appropriate, material-specific products.
Daily Care Essentials
Maintaining your kitchen countertops properly can greatly extend their lifespan and preserve their aesthetic appeal. Your daily cleaning routines should include wiping surfaces with a soft cloth and mild dish soap, ensuring you don't let spills sit.
For effective stain removal techniques, tackle spots immediately using appropriate cleaners for your specific countertop material.
You'll want to incorporate protective measures into your daily habits. Always use cutting boards to prevent scratches, and place trivets under hot items to protect heat-sensitive surfaces.
Don't forget to avoid harsh chemicals that can damage your countertops - stick to pH-neutral or gentle cleaners instead. When cleaning, work with soft cloths or sponges rather than abrasive scrubbers, and keep surfaces dry to prevent water damage, especially near seams.
Sealing Schedule Guide
Beyond daily cleaning, proper sealing represents a key aspect of long-term countertop care.
You'll need to understand the specific sealing schedule for your countertop material, as requirements vary considerably. Natural stone needs sealing every 6-12 months, while engineered stone typically doesn't require sealing products unless it has a rough finish.
To determine if it's time to apply new sealing techniques, perform a simple water test: if water doesn't bead up or gets absorbed quickly, you're due for resealing.
Before applying any sealant, verify your surface is completely clean and dry. You'll want to avoid over-sealing, which can create a hazy appearance.
For the best results, always follow the manufacturer's guidelines and consider consulting a professional for material-specific recommendations.
Long-Term Protection Methods
To guarantee your countertop's longevity, you'll need to implement a thorough protection strategy that goes beyond basic cleaning.
Start by establishing a regular countertop sealing schedule, particularly for natural stone surfaces that require monthly treatments to prevent staining and damage.
Don't forget moisture prevention techniques, including applying silicone sealant around fixtures, edges, and seams.
You'll want to maintain your countertops based on their specific material requirements.
For granite, use stone-specific cleaners and perform regular impregnation.
If you've got quartz, stick to gentle cleaning solutions and soft cloths.
For butcher block countertops, apply food-grade mineral oil monthly to prevent drying.
Remember to use trivets for hot items and clean spills immediately, regardless of your countertop material, to guarantee lasting protection and beauty.
Heat and Stain Resistance

When selecting kitchen countertops, heat and stain resistance rank among the most critical performance factors since these surfaces endure daily exposure to hot cookware and potentially damaging substances.
You'll find excellent heat resistance in materials like granite, quartzite, and soapstone, which can handle hot pots without damage. For stain resistance, you can't go wrong with porcelain, stainless steel, or properly sealed granite.
Keep in mind that even heat-resistant materials have their limits. You'll need to protect against thermal shock and avoid prolonged exposure to extreme temperatures.
While materials like quartz offer excellent stain resistance, they can be vulnerable to heat due to their resin content. Remember to maintain regular sealing schedules for natural stones and clean spills promptly to guarantee lasting protection.
Installation Considerations and Costs
Installing kitchen countertops requires careful planning and a clear understanding of costs.
You'll need to prepare your space by clearing the area and guaranteeing proper utility disconnection before the installation timeline begins.
The process starts with an initial consultation and moves through templating, fabrication, and final installation.
When budgeting for your project, consider both material and labor costs.
Butcher block ranges from $50 to $150 per square foot, while premium options like quartz run between $90 and $110.
You'll also need to factor in additional expenses for seam joining, edge profiling, and protective sealants.
Remember that proper installation is essential for longevity, so it's worth investing in professional services to make sure your countertops are perfectly level and securely fitted.
Environmental Impact of Counter Materials

Understanding the environmental impact of countertop materials has become increasingly essential for sustainable home design.
When choosing your countertop, you'll want to evaluate both sustainable sourcing and material recycling options. Quartz countertops offer lower environmental impact compared to natural stone, as they're engineered from waste materials and don't require sealing.
While natural stone countertops like granite and marble come from finite resources, you can minimize their impact by choosing locally quarried options to reduce transportation emissions.
Wood countertops can be environmentally friendly when sourced from responsibly managed forests, while epoxy countertops have a higher environmental footprint due to petrochemical use.
To make the most eco-conscious choice, look for materials with environmental certifications and assess their long-term durability and end-of-life recyclability.
Conclusion
Like selecting the perfect partner, choosing your ideal countertop requires careful consideration of your lifestyle, budget, and personal style. You'll find that balancing durability with beauty isn't just a dream - it's achievable with today's diverse material options. Whether you're drawn to the timeless elegance of granite or the modern appeal of quartz, you're now equipped to make an informed decision that'll serve your kitchen needs for years to come.
Kitchen Cabinet Upgrades
You can transform your kitchen cabinets through several cost-effective upgrades without a full replacement. Start by evaluating your cabinets' condition and organization needs, then consider painting them with durable semi-gloss finishes or refacing with new veneers, saving up to 90% compared to new installations. Add functionality with roll-out trays, lazy Susans, and vertical dividers to maximize storage space. Update hardware with trending finishes like matte black or brushed nickel for instant modernization. Crown molding and glass panel inserts can elevate basic cabinets to custom-looking pieces, while strategic organization methods will enhance your kitchen's efficiency. These smart upgrades open the door to countless possibilities for your kitchen's transformation.
Assessing Your Cabinet Needs

When it comes to upgrading your kitchen cabinets, a thorough assessment of your existing setup will help you make informed decisions.
Start your cabinet evaluation by checking for signs of wear, water damage, or structural issues that might indicate the need for replacement rather than simple repairs. You'll want to inspect the cabinet boxes carefully, looking for any warping, mold, or deterioration that could compromise their integrity. The typical cost range is $4,000-$10,000 for a professional cabinet refacing project. Consider the potential for long-term investment when deciding on the quality of materials.
Next, conduct a detailed storage assessment to determine if your current cabinet configuration meets your needs. Reflect on whether you're struggling with insufficient space or awkward corner cabinets that make organization difficult.
You'll need to evaluate if adding more drawers, shelves, or specialized storage solutions could improve your kitchen's functionality. Don't forget to think about how well your existing layout works with your daily routines and whether it's time for a more efficient arrangement.
If you're finding only cosmetic issues, you might be able to opt for refacing rather than replacement.
However, if you're discovering significant structural problems or your storage needs have outgrown your current setup, you'll want to contemplate a more extensive upgrade.
Painting and Refacing Options
Many homeowners face two popular and cost-effective options for transforming their kitchen cabinets: painting and refacing. When you're considering color selection and finish types, you'll need to weigh the benefits of each approach carefully.
If you're leaning toward painting, you'll find various options from oil-based to latex and hybrid paints. Your choice of finish matters considerably, with semi-gloss and high-gloss options offering excellent durability for kitchen environments. You'll want to avoid matte finishes, as they're less resistant to moisture and harder to clean. A proper curing time is essential for achieving maximum paint hardness and longevity. Additionally, performing proper prep work ensures the best results and longevity for your paint job.
Here's what you can expect during a cabinet makeover:
- Proper surface preparation, including thorough cleaning and sanding
- Application of high-quality primer suitable for your paint type
- Multiple thin coats of paint with adequate drying time between layers
- Installation of new hardware for a complete transformation
- Professional-grade tools like foam rollers or paint sprayers for smooth results
Refacing offers another viable option, allowing you to completely change your cabinets' appearance while keeping the existing boxes. This process involves applying new veneer or solid wood panels and typically costs less than full cabinet replacement but more than painting. It is an affordable alternative to traditional cabinet refinishing, making it a popular choice among homeowners.
Adding Decorative Crown Molding

When you're ready to elevate your kitchen's appearance with crown molding, you'll need to gather essential tools like a compound miter saw, tape measure, and level while carefully selecting the molding style that matches your cabinets' design. Starting with the right measurements and proper tools will make your installation process smoother, whether you're attempting a DIY project or working with a professional. Standard heights range between 3 to 6 inches for rooms with 8-foot ceilings. To ensure a successful installation, it's also important to consider how the crown molding will enhance your overall kitchen ambiance and complement existing decor. For the most polished results, you'll want to contemplate factors like ceiling height, cabinet style, and whether you'll incorporate additional elements such as light rail molding or interior crown pieces.
Molding Selection and Tools
Throughout the process of upgrading kitchen cabinets, selecting the right crown molding and tools stands as an essential step in achieving a polished, high-end look.
You'll need to take into account various molding materials and installation techniques that align with your cabinet style and budget. Direct molding attachment requires at least one inch of space above the marking line. Whether you're opting for traditional crown molding or a more elaborate stacked design, the right tools will make your installation process smoother and more precise.
To guarantee successful installation, you'll want to gather these essential items:
- A compound miter saw for clean, accurate angle cuts
- Reliable measuring tools, including a tape measure and angle finder
- Brad nails or staples for secure attachment
- Wood filler and spackle to conceal any gaps
- L-brackets and framing materials for additional support
When selecting your molding, think about how it'll work with your ceiling height and overall kitchen design.
Traditional crown molding offers a classic look, while stepped or stacked options can add dramatic visual interest.
Remember that more intricate designs typically require additional installation time and expertise, but they can transform your kitchen's appearance by drawing the eye upward and creating a sophisticated, finished look.
Easy Installation Steps
Transforming your kitchen cabinets with crown molding starts with a systematic approach to installation. Before diving into various crown molding styles, you'll need to carefully measure and mark your cabinet dimensions, ensuring you've accounted for any gaps that might require filler strips. The renovation process may take considerable time, as evidenced by similar projects taking up to two years to complete. During this period, your kitchen will benefit from quality craftsmanship that enhances both beauty and functionality.
It's crucial to attach scrap wood around the cabinet tops, which provides a secure surface for nailing the molding.
When you're ready to implement these installation techniques, you'll want to focus on precise cutting using a compound miter saw. Cut your pieces slightly longer than needed, and always test the angles before making final cuts.
For inside corners, you'll need to create opposing 45-degree angles, while outside corners require sister cuts and additional support with wood glue and tape.
Once you've secured the molding with a nail gun, you're not quite finished. You'll need to fill nail holes with wood putty and caulk the seams for a polished look.
After letting everything dry, prime and paint the molding to match your cabinets. Don't forget to inspect your work for any imperfections that might need touching up.
Professional Design Tips
Professional designers emphasize that successful crown molding installations start with selecting the right style for your space.
When planning your crown molding design, you'll need to take into account your ceiling height, cabinet style, and overall room aesthetics. Professional installation might be necessary for complex designs, especially when working with traditional or stacked crown molding styles. Installation typically requires 10 to 30 minutes per linear foot of molding. Additionally, consider that using eco-friendly materials can enhance the sustainability of your kitchen renovation.
Here's what expert designers recommend for a stunning crown molding installation:
- Choose materials that complement your existing cabinets, with wood being ideal for traditional looks and MDF offering budget-friendly alternatives.
- Think about layering different molding types to create more dramatic visual impact and depth.
- Match the molding style to your cabinet doors, guaranteeing a cohesive design throughout the space.
- Account for proper spacing between cabinets and ceiling, particularly in rooms with high ceilings.
- Plan for adequate support and proper installation techniques to prevent sagging or damage.
Remember that crown molding isn't just decorative - it's an investment in your kitchen's overall appeal.
You'll want to balance your design aspirations with practical considerations like material costs and installation requirements. If you're working with intricate patterns or expensive materials, it's worth consulting professionals to guarantee flawless execution.
Material Selection and Durability
Your kitchen cabinet's longevity and appearance largely depend on the materials you choose. When selecting cabinet materials, you'll need to balance durability, cost, and maintenance requirements to make the best choice for your home.
For maximum material longevity, hardwood and stainless steel stand out as top performers. Non-porous stainless steel is particularly suitable for busy kitchens due to its resistance to bacteria and stains. While they're more expensive initially, their durability often justifies the investment.
If you're working with a tighter budget, plywood offers an excellent middle-ground option, providing good moisture resistance and structural stability without the premium price tag.
Consider your kitchen's environment when making your selection. If you're dealing with high humidity, avoid particleboard and MDF, as they're susceptible to water damage. Instead, opt for materials like melamine or laminate, which offer better moisture resistance and easy maintenance.
For those seeking an eco-friendly option that doesn't compromise on quality, oak presents a sustainable choice with its natural durability and classic appeal.
Remember that proper maintenance plays a vital role in extending your cabinets' life span. Regular cleaning with appropriate products and prompt attention to any damage will help preserve your investment, regardless of the material you choose.
Strategic Cabinet Organization Methods

Well-organized kitchen cabinets transform daily cooking tasks from chaotic to effortless. By implementing strategic organization methods, you'll enhance cabinet accessibility while maximizing organizing efficiency in your kitchen space.
Start by categorizing items and creating designated zones that align with your cooking workflow. Regular maintenance ensures your organized system stays effective long-term.
Consider these smart organization strategies to revolutionize your cabinet space:
- Install roll-out trays in lower cabinets for easy access to heavy pots and pans
- Utilize corner drawers or lazy Susan cabinets to maximize awkward corner spaces
- Incorporate vertical dividers for storing baking sheets and cutting boards
- Add drawer organizers to keep utensils and small items neatly arranged
- Implement pull-out waste bins near the sink for convenient disposal
Place frequently used items in easily accessible locations, keeping heavier items in lower cabinets and lighter ones up high.
You'll want to position cookware near the stove and dishware close to the dining area.
Consider adding innovative storage solutions like custom cabinet inserts for spices or knife blocks.
These thoughtful organization methods won't just improve your kitchen's functionality—they'll make cooking more enjoyable and efficient.
Hardware Replacement Techniques
Replacing cabinet hardware can instantly refresh your kitchen's appearance without a complete renovation. When following current hardware trends, you'll find that finishes like matte black, chrome, and brass are popular choices that can dramatically transform your space.
Before installation, you'll need to remove existing hardware carefully using a screwdriver or cordless drill driver. Simple hand tools are all you need for this project.
Here are essential installation tips to guarantee success:
First, remove all old hardware and fill any unused holes with wood filler if your new pieces require different placement. When installing new hardware, maintain consistency in finish throughout your kitchen for a cohesive look.
You'll want to carefully measure and mark new hole locations, especially if you're switching from knobs to pulls. Consider mixing hardware types for visual interest while making sure they complement other kitchen elements like your faucet and fixtures.
For panel-ready appliances, select oversized pulls that match your cabinet hardware but provide adequate grip.
Remember to double-check all measurements before drilling new holes, and test the functionality of each piece after installation. Make any necessary adjustments to guarantee proper alignment and smooth operation of all doors and drawers.
Cost-Effective Upgrade Solutions

When you're looking to refresh your kitchen cabinets, you'll find that painting existing cabinets costs considerably less than replacing them while still delivering dramatic results.
Adding decorative molding to cabinet faces or tops can transform basic units into custom-looking pieces that rival high-end installations. Installing glass door inserts can add an elegant touch while displaying your favorite dishware.
You can further enhance your cabinets' appearance by updating hardware, which offers an impressive return on investment as new handles and pulls instantly modernize the entire kitchen's look.
Paint Vs New Cabinets
Kitchen cabinet makeovers present a pivotal choice between painting existing cabinets and installing new ones. When considering paint durability and current color trends, you'll find that painting offers a cost-effective solution at $1,900-$3,415, considerably less than new cabinet installation. Your existing cabinets can transform dramatically with proper preparation and high-quality paint selection.
Consider these key factors when deciding between painting and replacement:
- Paint provides a fresh look while saving 85-90% compared to new cabinet costs
- Complex cabinet designs may increase painting costs by 10-15%
- Semi-gloss and satin finishes offer ideal durability for kitchen environments
- Professional spray application delivers superior results versus roller methods
- Strategic color selection can modernize your space while maintaining resale value
If you're working with structurally sound cabinets, painting offers an excellent return on investment.
However, if your cabinets show considerable wear or you're seeking a complete style overhaul, new installations might be worth the investment.
Consider RTA or stock cabinets for a middle-ground solution that combines fresh materials with cost efficiency. Your choice should align with both your budget constraints and long-term kitchen vision.
Molding for Style Impact
Molding transforms ordinary cabinets into eye-catching focal points while remaining one of the most cost-effective upgrades you can make. With various molding styles available, from crown to light rail, you'll find options that perfectly complement your kitchen's aesthetic. A single molding project typically costs between $400 and $800, though you can save considerably by tackling the installation yourself.
When selecting your molding finishes, consider matching them to your existing cabinet design for a cohesive look. You can create dramatic effects by layering different types of molding, such as combining crown molding with decorative inserts.
For installation, you'll need basic tools like a miter saw set at 45 degrees and a Brad nailer to guarantee precise cuts and secure attachment. To maximize your investment, start by building up cabinet tops with 1x4 boards for added strength.
Don't forget to dry-fit pieces before final installation, and use tape and glue for tight corners. Finally, caulk seams and nail holes, then paint to match your cabinets. This attention to detail guarantees your molding upgrade looks professionally installed while staying within budget.
Hardware Update Magic
A well-chosen hardware upgrade can transform your kitchen's appearance without breaking the bank.
Today's market offers numerous trendy finishes and budget renovations that deliver significant impact with minimal investment. Retailers like Amerock Hardware and Top Knobs Hardware provide stylish options that won't strain your wallet.
Consider these contemporary hardware choices that can elevate your kitchen's style:
- Matte black cabinet pulls for a modern, sophisticated look
- Brushed nickel knobs to create a timeless, versatile appeal
- Glass or crystal knobs that add vintage charm and elegance
- Oil-rubbed bronze pulls for a warm, inviting atmosphere
- T-bar handles that deliver sleek, contemporary flair
Beyond aesthetics, functional upgrades can enhance your kitchen's usability.
Installing soft-close hinges reduces noise and wear, while slide-out drawers maximize storage space in deep cabinets. You'll find cost-effective solutions through bulk purchasing on platforms like Amazon or through budget-friendly brands such as D Lawless Hardware and Franklin Brass.
These simple changes not only refresh your kitchen's appearance but also improve its functionality, making your space more enjoyable and efficient without requiring a complete remodel.
Glass Panel Installation Process
Installing glass panels in cabinet doors requires careful preparation and precise execution to achieve professional results.
You'll need to start by selecting the right glass panel type for your needs - whether it's clear, frosted, or Plexiglas - and guarantee your cabinet doors can accommodate the installation. Common installation challenges include achieving precise measurements and maintaining proper support for the glass.
Before you begin, remove the cabinet door from its hinges and carefully measure the opening where you'll place the glass. If you're creating a new opening, you'll need to mark and cut the center panel, being mindful of safety precautions.
Once you've prepared the space, you can secure the glass using rubber stoppers, wood strips, or silicone caulk. For added stability, consider installing glass fasteners with screws.
After installation, let the silicone cure for 24 hours before rehanging your doors. You'll want to double-check for any gaps or loose areas and make adjustments as needed.
Regular maintenance, including gentle cleaning of both the glass and surrounding frame, will keep your upgraded cabinets looking pristine for years to come.
Space-Saving Storage Solutions

While glass cabinet doors can enhance visual appeal, smart storage solutions maximize your kitchen's functionality. Through vertical space maximization, you'll transform cluttered cabinets into efficient storage areas that work for your daily needs.
Installing risers, dividers, and under-shelf baskets creates additional layers of storage while keeping items organized and accessible.
Consider these practical hidden storage solutions that you can implement today:
- Mount magnetic strips under cabinets or on doors to keep metal utensils within easy reach
- Install two-tiered drawer organizers for better utensil management
- Add hooks inside cabinet doors for hanging measuring spoons and small cookware
- Use corner-mounted Lazy Susans to maximize previously wasted space
- Incorporate toe-kick drawers beneath base cabinets for storing large, flat items
You'll find that strategic organization makes a significant difference in your kitchen's efficiency.
Place frequently used items at eye level and within arm's reach of your main prep area. Store occasional-use items on higher shelves or in less accessible spaces.
Conclusion
Just as a caterpillar transforms into a butterfly, your kitchen cabinets can undergo a remarkable metamorphosis with thoughtful upgrades. You'll find that each improvement, from fresh paint to innovative storage solutions, builds upon the last to create a more functional and beautiful space. Whether you're working with a modest budget or planning a complete overhaul, you've now got the tools to breathe new life into your kitchen's most prominent features.