Permit Requirements for ADUs and Additions in San Diego County
In unincorporated San Diego County, ADU and addition permits depend on your zoning, unit type, and lot. You’ll need detailed site plans, architectural drawings, and setback and height information, plus potential environmental or septic documents. Detached ADUs can be up to 1,200 sq ft; JADUs up to 500 sq ft; attached units have their own size rules. Expect a 60‑day target for approvals after a complete application. If you keep exploring, you'll uncover key steps and timelines in detail.
ADU Eligibility and Zoning in Unincorporated San Diego County
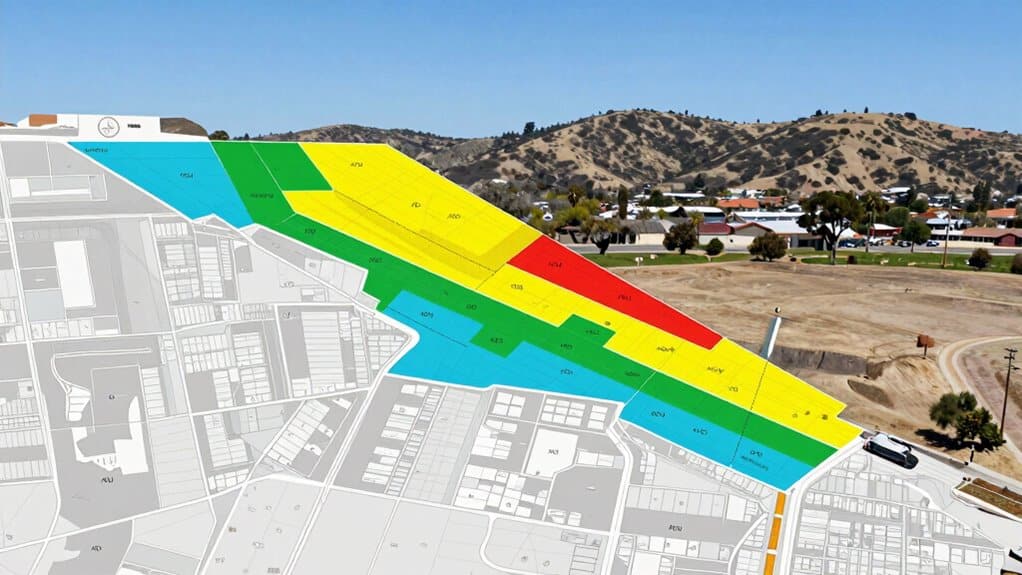
In unincorporated San Diego County, ADU eligibility and zoning hinge on whether your lot is residential and how you plan to use the space.
If your property is zoned for residential use with an existing or proposed single-family dwelling, you’re eligible for one detached ADU, and you can convert permitted spaces within an accessory structure or the dwelling itself. A junior ADU is also permitted alongside a detached ADU on single-family lots.
For multifamily sites, residential zoning allows two detached ADUs or space-conversions, with height and conversion limits.
You’ll face overlay and fire-zone considerations that affect feasibility. Understand ADU financing options early, and anticipate zoning compliance challenges to avoid delays or redesigns.
Size Limits and Unit Types for ADUs
Size limits for ADUs are defined clearly, with different caps depending on whether the unit is detached, attached, or a JADU.
You’ll find that detached ADUs can reach up to 1,200 square feet, with a minimum of 150 square feet, and no dependency on the primary residence’s size.
Attached ADUs are limited to 50% of the primary residence, capped at 1,200 square feet, though studios or one-bedroom units may go up to 850 square feet and two-bedroom units up to 1,000 square feet, with a 150-square-foot minimum.
JADUs cap at 500 square feet, starting from 150 square feet, created within the existing home.
Setbacks, Height, and Placement Requirements

Setbacks, height, and placement rules determine how you can position an ADU on your property while meeting safety and zoning standards.
You’ll see that side setbacks vary: newly constructed detached ADUs require a minimum 4-foot side setback, with zero side setbacks allowed for some small detached units, while exterior side yards on corner lots need 4 feet from easements or streets.
Rear setbacks also differ, with zero rear setbacks for certain small detached ADUs outside high fire zones and a mandatory 4-foot rear setback in Very High Fire Hazard zones.
Height rules matter too: under 16 feet you may enjoy reduced setbacks, but taller structures face stricter limits.
Placement requires a 6-foot separation from other structures, and front encroachment can be allowed under recent state and local rules for eligible sizes.
Setback regulations and height limitations guide every decision.
Required Permit Documents and Review Timeline
Maneuvering the required permit documents and the review timeline starts with knowing what you must submit and when. You’ll need detailed site plans and architectural drawings to prove zoning and building code compliance, plus documentation showing residential zoning and an existing primary dwelling.
Site plans must display setbacks, building separations, and lot coverage, while architectural plans specify square footage, height, and entrance locations for your ADU or JADU. Environmental notes may be required, such as septic plans or fire department approvals in wildfire-prone areas.
The permit review process aims to finalize approvals within 60 days of a complete application, with San Diego County usually taking 4–10 weeks. Incomplete submissions trigger corrections that pause the clock, and streamlined pathways may apply if standards are met.
When planning for an ADU, it's crucial to understand the benefits of incorporating sustainable features and working closely with professionals to enhance property value.
Additions, Ownership, and Special Programs for 2026 ADUs
ADUs in 2026 bring notable changes to ownership, occupancy, and special programs, making it easier for property owners to maximize usable space while meeting state and local requirements.
You’ll find that ADU ownership can’t be sold separately from the primary residence under standard rules, except in approved affordable housing programs or SB 9 lot splits, which must meet strict zoning and affordability criteria.
Owner-occupancy is no longer required for most ADUs, allowing you to rent both the main house and ADU if you choose.
JADUs retain occupancy rules, but new AB 1154 removes them for JADUs with separate bathrooms.
Multifamily sites gain flexibility with expanded detached ADU limits.
Special programs, including bonus and standard plan options, help streamline approvals and reduce costs.
Wrapping It Up
You’ll find that ADUs and additions in unincorporated San Diego County follow clear rules focused on safety and livability. By understanding eligibility, size limits, setbacks, and permit documents, you’ll streamline the process and avoid delays. The process emphasizes proper planning, timing, and coordination with county review steps. With careful preparation and attention to requirements, you can confidently pursue thoughtful upgrades that enhance value and housing options while staying compliant and informed throughout 2026.
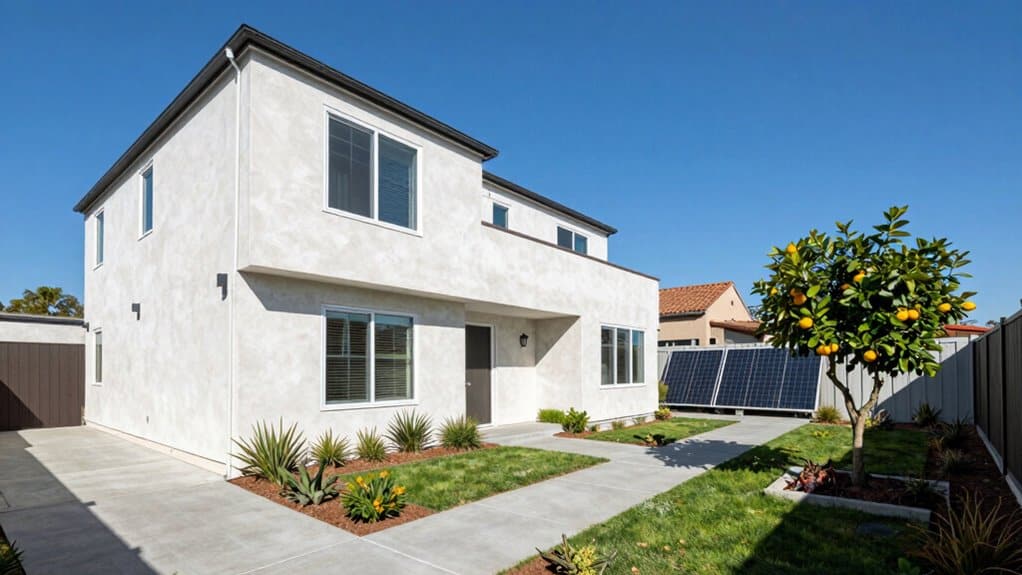
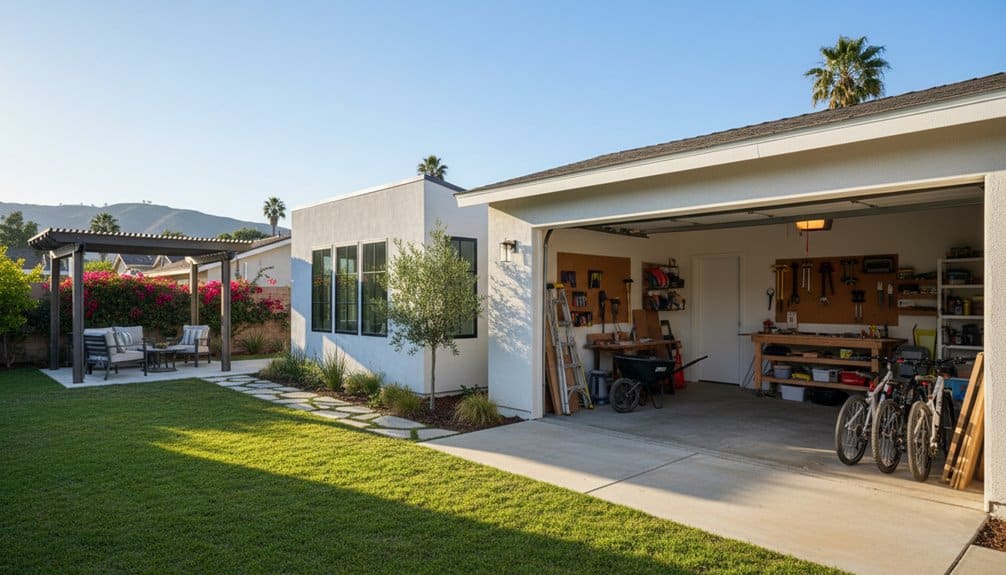
Garage to ADU Conversion in San Diego: From Parking Spot to Income Suite
Have you ever considered transforming your garage into a valuable asset? Converting your San Diego garage into an ADU (Accessory Dwelling Unit) not only optimizes underutilized space but also offers an exciting opportunity for homeowners looking to generate income. Many San Diego residents face the dual challenges of rising housing costs and the need for additional income streams. This article will guide you through the process of navigating design, understanding costs, and complying with regulatory steps for a successful garage conversion. By the end, you'll know how to secure permits, create architectural plans, and adhere to safety and zoning codes—all while tapping into the potential for rental income that typically ranges from $2,200 to $2,800 per month. Plus, you may see your property value increase by as much as 25%. Join us as we explore how you can turn your parking spot into a profitable income suite!
Understanding San Diego Garage Conversion Regulations
What're the key regulations for garage conversions in San Diego?
If you're planning to convert your garage into a livable space in San Diego, it's crucial to be aware of the local regulations.
Garage conversions fall under California’s ADU laws, which allow you to modify existing structures without expanding your home's footprint. Key requirements include obtaining a Building Permit and complying with safety standards, such as adequate ceiling heights and emergency exits.
San Diego garage conversions must meet ADU laws, requiring a building permit and adherence to safety codes like ceiling height and emergency exits.
- Submit architectural drawings to the City of San Diego’s Development Services Department.
- Ensure compliance with local zoning regulations.
- If located within half a mile of public transit, you won't need to replace lost parking spaces. Additionally, it's important to consider the need for garage space before proceeding with the conversion.
Understanding these guidelines can streamline the permitting process and enhance your property's income potential.
For further details, see our guide on ADU requirements in California.
Evaluating Costs: Budgeting for Your Garage ADU
What're the financial considerations for converting a garage into an ADU in San Diego?
Understanding the financial aspects of a garage conversion is crucial. Costs for garage conversions in San Diego typically fall between $80,000 and $200,000, depending on the scale of the project.
Homeowners should allocate around 15-20% of their budget for design and permitting fees, while construction will make up the remaining 80-85%. It’s wise to set aside an additional 15-20% as a contingency to address unforeseen expenses like utility upgrades.
- Design and permitting costs: $5,000–$10,000
- Construction expenses: $90,000–$140,000+
- Reserve a budget contingency for unexpected costs
This additional living space can become a lucrative long-term investment through rental income. Additionally, converting your garage into an ADU can tap into the rental demand that is currently thriving in the San Diego real estate market.
For more insights on maximizing your ADU's potential, see our guide on rental strategies.
Key Design and Permitting Steps

Starting your garage-to-ADU project in San Diego involves careful planning and adherence to city regulations.
But what're the essential elements to consider when creating your design?
Understanding the necessary permits and building codes will ensure a seamless transition from concept to construction, setting the stage for your ideal accessory dwelling unit.
Drafting Functional Floor Plans
How can you maximize space in an ADU floor plan?
When drafting functional floor plans for a garage-to-ADU conversion in San Diego, maximizing usable space is essential.
Utilize open-concept layouts to create an airy and spacious feel, even in smaller areas. This design approach fosters a seamless flow between living, dining, and kitchen spaces, enhancing the overall experience.
Additionally, integrating plumbing and electrical systems early in the design process prevents costly modifications down the line.
Remember to include energy-efficient features, such as LED lighting and high-quality insulation, to ensure sustainability and lower utility costs.
Considering the potential for increased property value, it's crucial to design with both functionality and aesthetics in mind to attract future renters or buyers.
- Embrace open-concept designs to enhance space perception.
- Plan plumbing and electrical systems from the beginning to minimize changes.
- Incorporate energy-efficient and customizable elements to boost functionality.
For more detailed guidance on creating effective ADU plans, check our comprehensive guide on design best practices.
Navigating Permit Approvals
How do I navigate the permit approval process for my garage-to-ADU conversion in San Diego?
Successfully navigating the permit approval process for your garage-to-ADU conversion in San Diego is crucial for project success.
First, prepare detailed architectural plans and blueprints, which you must submit to the Development Services Department. Compliance with local regulations and ADU requirements is essential, along with obtaining zoning clearance to ensure your design aligns with neighborhood standards.
- Expect costs between $10,000 and $18,000 for various permits.
- Schedule structural inspections to confirm adherence to building codes.
- Collaborate with experienced builders and ADU architects to facilitate timely approvals.
For more insights on construction and permitting, see our guide on navigating the ADU process.
Meeting Code Requirements
What're the essential code requirements for a garage-to-ADU conversion in San Diego?
When converting a garage into an Accessory Dwelling Unit (ADU) in San Diego, understanding code compliance is crucial. This ensures your new ADU is safe, legal, and comfortable.
The City's Development Services Department will scrutinize your building permit application for adherence to safety standards, zoning regulations, and parking needs. Key requirements include minimum ceiling heights, emergency exits, and potential upgrades to utilities like plumbing, electrical, and HVAC systems.
- Submit comprehensive plans for building permit approval.
- Ensure all safety and utility enhancements comply with code.
- Address zoning and parking requirements early in the process.
For a smooth experience, collaborate closely with a contractor experienced in garage conversion regulations.
Discover more about the permitting process in our detailed guide.
Navigating Construction and Hidden Expenses
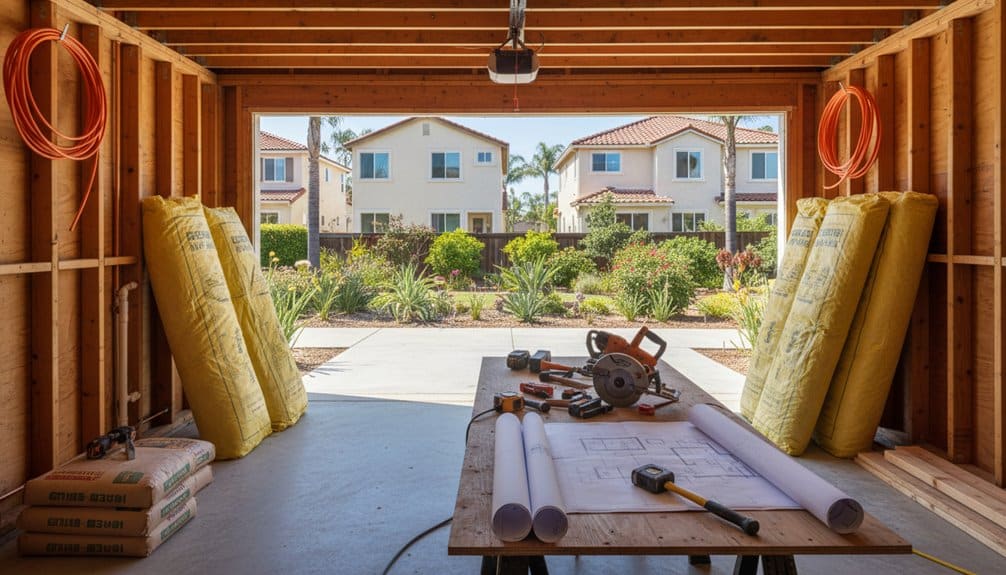
What unexpected costs should homeowners anticipate when converting a garage into an ADU?
Converting your garage into an Accessory Dwelling Unit (ADU) can lead to unforeseen expenses that may surprise many homeowners.
Construction costs typically represent 80-85% of total expenses, with foundational work estimated between $15,000 and $25,000. Additionally, framing modifications could add another $20,000 to $30,000.
To safeguard your budget, consider these potential hidden costs:
- Utility upgrades may run from $20,000 to $50,000.
- Temporary storage fees could range from $200 to $400 monthly for 6-8 months.
- Always include a 15-20% contingency for unexpected challenges.
For more detailed guidance on budgeting for your ADU project, see our comprehensive guide on construction expenses.
Maximizing Value: Rental Income and Property Appreciation
How can a garage-to-ADU conversion increase your financial value?
Transforming your garage into an accessory dwelling unit (ADU) can significantly enhance your financial position. In San Diego, homeowners can benefit from consistent rental income, typically ranging from $2,200 to $2,800 monthly, which not only improves cash flow but also boosts your return on investment.
Additionally, property values may experience an increase of 15% to 30%, making this conversion a wise long-term investment.
- Monthly Income: Provides reliable cash flow and offsets initial conversion costs.
- Appreciation: Your property’s market value rises post-ADU addition.
- Tax Benefits: Depreciation deductions can reduce taxable income by $5,000 to $7,000 annually.
For further insights on maximizing rental income, see our guide on effective property management strategies.
Comparing Garage Conversions to Other ADU Options
How do garage conversions compare to other ADU options in San Diego?
Garage conversions are a cost-effective choice for homeowners looking to add living space. By repurposing an existing structure, you save on hefty construction expenses and avoid lengthy site preparation, potentially saving between $80,000 and $120,000 compared to building a detached accessory dwelling unit (ADU).
Typically costing between $80,000 and $160,000, garage conversions can be completed within 8 to 10 months, making them a quicker solution.
While detached ADUs may offer slightly higher rental yields and property value increases, garage conversions still provide solid returns, with potential rental income ranging from $2,200 to $2,800 per month and a 20-25% increase in property value.
For more insights on maximizing your property, check out our guide on optimizing rental income.
Common Uses and Long-Term Benefits of Garage ADUs
How do garage ADUs benefit homeowners in San Diego?
Garage ADUs in San Diego provide homeowners with versatile living options and significant long-term advantages. By converting your garage into an accessory dwelling unit, you can generate rental income, enhance property value, and create a functional space tailored to your needs.
- Rental Income: Earning $2,200–$2,800 monthly can help offset your mortgage and improve financial security.
- Guest Suite or In-Law Apartment: Offer family or friends a comfortable and private stay.
- Home Office/Studio: Create a dedicated workspace, meeting the demands of remote work while increasing your property's worth.
For more insights on maximizing your property's potential, check out our guide on the long-term benefits of ADUs.
Conclusion
Converting your San Diego garage into an ADU is a smart investment that maximizes your property’s potential. By implementing the strategies discussed, you can increase your property value and create a lucrative rental opportunity, all while addressing housing needs in your community. Embracing this transformation not only enhances your living space but also offers a sustainable solution to urban housing demands. Why not take the first step today? Explore more tips on maximizing your property’s potential and consider reading our related guide on ADU design ideas to inspire your project.
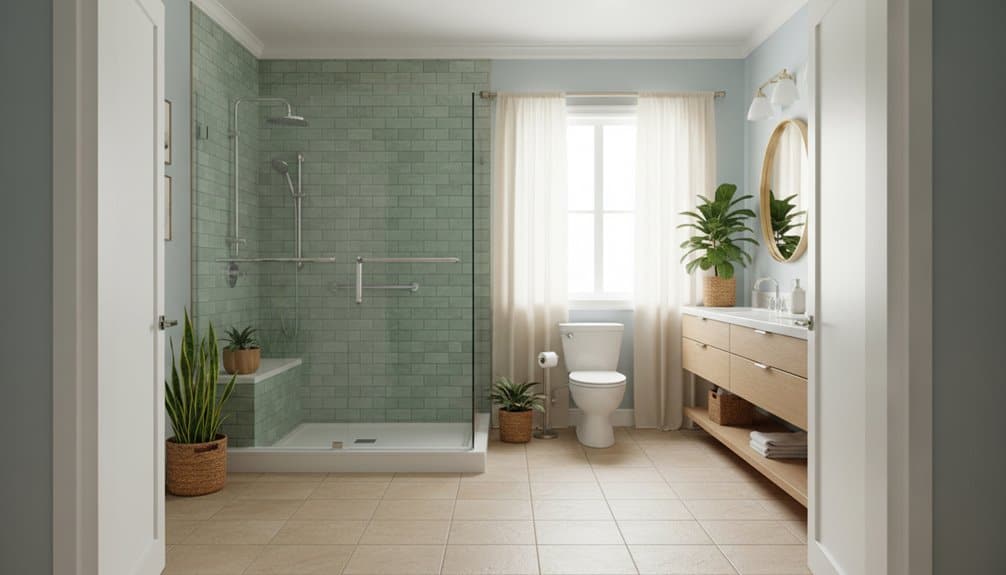
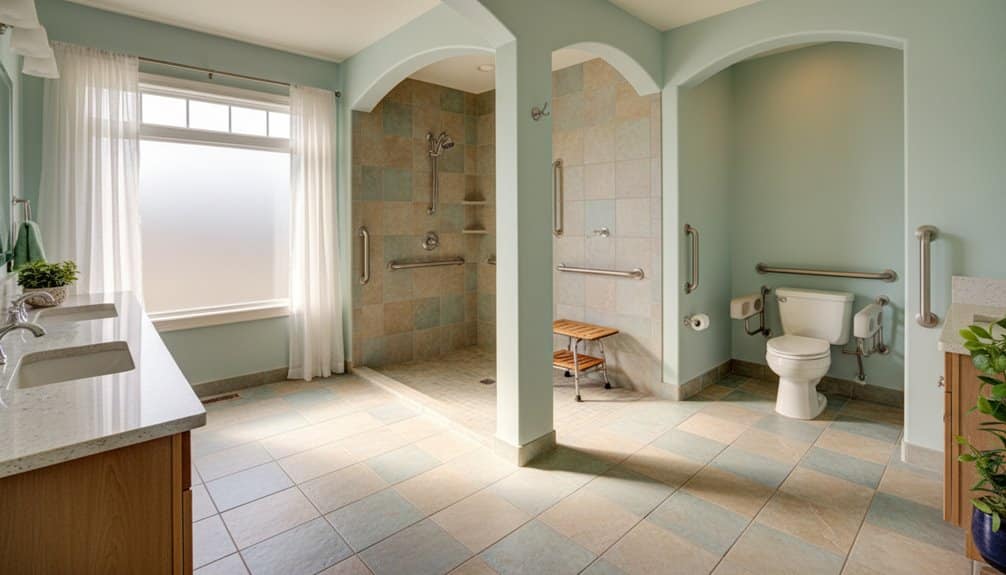
Aging-in-Place Bathroom Design for San Diego Homes
As we age, the simple act of using the bathroom can become a daunting challenge. Did you know that nearly one in three seniors experience a fall each year, often occurring in the bathroom? For homeowners in San Diego, the solution lies in thoughtful aging-in-place bathroom design. This article is tailored for seniors, caregivers, and family members looking to create a safe, comfortable, and accessible bathroom environment. It addresses the core challenge of ensuring safety and ease of use while maintaining independence. You'll discover essential features such as grab bars, non-slip flooring, and walk-in showers that enhance safety. We’ll also explore the importance of lighting, the benefits of raised toilet seats, and lever-style faucets for daily convenience. Additionally, we’ll discuss how to widen doorways and integrate smart storage solutions. By the end, you'll have a comprehensive roadmap to transform your bathroom into a sanctuary that supports aging in place.
Understanding the Needs of Aging Homeowners
How can bathroom modifications enhance safety for aging homeowners?
As we age, our physical abilities can diminish, making everyday activities, like using the bathroom, increasingly difficult and potentially hazardous.
Implementing bathroom modifications is essential for promoting safety and independence. Key features such as grab bars, non-slip flooring, and walk-in tubs can significantly reduce the risk of falls while ensuring ease of access.
Grab bars, non-slip flooring, and walk-in tubs are vital bathroom modifications that enhance safety and independence for aging homeowners.
- Install grab bars near the toilet and in the shower.
- Opt for non-slip mats or flooring to prevent accidents.
- Consider a walk-in tub or a shower with a low threshold.
By focusing on these enhancements, you create a more secure environment that supports aging in place. Additionally, working with professionals who specialize in accessibility modifications can provide tailored solutions to meet specific needs.
For further tips on home safety, see our guide on universal design principles.
Key Safety Features for Senior-Friendly Bathrooms
When updating a bathroom for aging in place, focusing on essential safety upgrades like grab bars and non-slip flooring is crucial for preventing slips and enhancing accessibility. But how can you further improve the space to support daily routines? Exploring thoughtful lighting and toilet height adjustments can lead to even greater comfort and safety. Additionally, ensuring adequate lighting can help prevent slips and falls, further enhancing safety in the bathroom.
Essential Bathroom Safety Upgrades
How can bathroom safety be improved for seniors?
Implementing specific upgrades can enhance bathroom safety for seniors, significantly lowering the risk of accidents. Start by installing grab bars near the toilet and in the shower; these solid supports aid in maintaining balance and mobility.
Replacing a traditional bathtub with a walk-in shower can also mitigate tripping hazards associated with high tub walls.
- Choose non-slip flooring to provide secure footing, even when wet.
- Ensure proper lighting for better visibility during nighttime trips.
- Consider adding a raised toilet seat for easier sitting and standing.
These adjustments create a safer bathroom environment. Additionally, it’s important to assess plumbing works to ensure that water flow and fixtures are optimized for senior use. For more comprehensive tips, check out our guide on senior-friendly home modifications.
Slip-Prevention and Accessibility
How can you enhance bathroom safety for seniors?
To create a safer bathroom environment for seniors, prioritize features that prevent slips and improve accessibility.
Start by installing grab bars near the toilet and shower, offering essential support. Non-slip flooring is also crucial, as it provides better traction compared to traditional surfaces, reducing fall risks.
Consider adding a raised toilet seat to assist those with limited mobility, making sitting and standing easier.
Additionally, ensure the bathroom is well-lit to enhance visibility, particularly during nighttime use.
Implementing these features will foster a safer, more navigable space.
For further insights on enhancing home safety, explore our guide on fall prevention strategies.
Accessible Showers and Bathtub Alternatives

How can accessible showers enhance safety for seniors?
Accessible showers significantly improve safety for seniors by eliminating common bathroom hazards. Features like no-step entries and curbless designs reduce the risk of trips and falls, allowing for easier access.
Furthermore, the inclusion of grab bars and handheld showerheads provides essential support and flexibility, catering to the needs of those with limited mobility.
- Install grab bars for added stability.
- Opt for handheld showerheads for better control.
- Choose slip-resistant flooring for extra safety.
These modifications create a more secure bathing environment, promoting independence and comfort.
To learn more about creating a safe bathroom space, see our guide on aging-in-place renovations.
Flooring, Lighting, and Slip-Prevention Strategies
When planning a bathroom for aging in place, it's crucial to prioritize slip-resistant flooring and effective lighting for safety.
But what other features can enhance accessibility and comfort in this essential space?
Exploring additional strategies can further ensure a functional environment that promotes independence.
Non-Slip Flooring Options
How can you choose non-slip flooring for a safer bathroom?
Selecting non-slip flooring for a bathroom is essential for enhancing safety, especially for those aging in place. Options like textured vinyl and rubber flooring provide excellent grip while being easy to maintain.
Additionally, cork flooring offers a softer surface that's naturally slip-resistant, making it a comfortable choice.
- Consider using non-slip backed area rugs for extra stability.
- Regularly maintain the floors to address spills promptly.
- Evaluate the flooring materials to ensure durability and water resistance.
By prioritizing these factors, you can significantly reduce the risk of slips and falls in your bathroom.
For more tips on creating a safe home environment, see our guide on home safety modifications.
Enhanced Bathroom Lighting
How can enhanced bathroom lighting improve safety for aging individuals?
Enhanced bathroom lighting significantly boosts safety for seniors by improving visibility in high-risk areas like showers and toilets.
Bright LED lights can eliminate dark spots, making it easier to identify obstacles and reducing the likelihood of slips and falls.
Installing motion-activated lights ensures that individuals never have to fumble for a switch in the dark.
- Use wall sconces or recessed fixtures to create even illumination.
- Opt for energy-efficient bulbs to maintain brightness without high energy costs.
- Consider adjustable lighting to accommodate varying needs throughout the day.
By combining superior lighting with non-slip flooring, you create a safer, more comfortable bathroom environment.
For more tips on creating a senior-friendly home, see our guide on aging in place.
Optimizing Bathroom Layout for Mobility and Independence
How can you optimize a bathroom layout for mobility and independence?
To create a bathroom that fosters independence and enhances mobility, focus on optimizing the layout to eliminate barriers and improve accessibility. Start by ensuring doorways are at least 36 inches wide to allow easy passage for mobility aids like wheelchairs and walkers.
Incorporating a no-step shower instead of a traditional tub minimizes tripping hazards, making entry safer.
- Install sturdy grab bars near the toilet and shower to provide essential support.
- Use slip-resistant flooring to prevent accidents in wet conditions.
These design choices significantly enhance safety and promote a sense of autonomy. For further insights, see our guide on accessible home modifications.
Storage Solutions and Easy-to-Use Fixtures
How can you enhance storage and fixture usability in an aging-in-place bathroom?
When designing an aging-in-place bathroom, prioritize effective storage solutions and user-friendly fixtures to promote independence.
Built-in cabinets and vertical shelving are essential for maximizing space, ensuring that daily essentials are easily accessible while minimizing clutter. Smart storage options like pull-out drawers enhance organization, making it simpler to keep toiletries within reach.
Additionally, opt for easy-to-use fixtures such as lever-style faucets and touch-activated controls, which cater to seniors with limited dexterity.
Wall-mounted sinks and lower countertops further improve accessibility, creating a comfortable workspace for daily routines.
For more tips on creating a senior-friendly bathroom, check out our guide on accessible design solutions.
Choosing Professional Remodeling Services in San Diego
How can you find reputable remodeling services for an aging-in-place bathroom in San Diego?
Finding the right professionals for your aging-in-place bathroom remodel involves focusing on contractors who are both licensed and insured, ensuring they provide quality and accountable work.
Prioritize licensed and insured contractors to guarantee quality workmanship and accountability for your aging-in-place bathroom remodel.
Look specifically for Certified Aging-in-Place Specialists (CAPS), who are trained to design safe and accessible spaces for seniors.
- Always request to see a portfolio of past projects.
- Check online reviews and references for insights into their reliability.
- Take advantage of free consultations many services offer to discuss your specific needs.
By following these steps, you can confidently select a contractor who'll help create a functional and aesthetically pleasing bathroom space.
For further assistance, see our guide on accessibility features for bathrooms.
Conclusion
In conclusion, an aging-in-place bathroom remodel is essential for enhancing safety and comfort in San Diego homes. By implementing accessible designs and slip-resistant features, you can significantly improve your daily living experience, allowing for greater independence and peace of mind. Embracing these strategies not only benefits your current lifestyle but also prepares your home for future needs. Consider exploring more tips on creating a senior-friendly space or diving into related guides that detail effective renovations. Your journey toward a well-designed, aging-in-place bathroom is just beginning!
San Diego Whole-Home Remodel Timeline: What Really Happens Month by Month
Are you considering a whole-home remodel in San Diego? You're not alone—many homeowners embark on this journey with dreams of transforming their living spaces. However, navigating the complexities of a remodel can be daunting. This article on the San Diego Whole-Home Remodel Timeline will guide you through each critical phase, from goal-setting and contractor selection in the initial month to design and permit acquisition over the next two months. You’ll learn about the demolition and site preparation stages, which pave the way for the extensive construction that follows. As you near completion, we’ll cover essential inspections and final touches that ensure your project is a success. By understanding what really happens month by month, you’ll be better equipped to manage expectations, avoid common pitfalls, and ultimately create the home of your dreams. Let's dive in and explore this exciting renovation journey together!
Defining Your Remodeling Goals and Vision
How can you ensure your whole-home remodel meets your expectations?
To ensure your entire home renovation aligns with your vision, start by precisely identifying your remodeling goals. Consider whether your aim is to increase property value or enhance functionality for everyday living.
Additionally, determine if this project is intended for long-term enjoyment or future resale; this decision will influence everything from material choices to budget allocations.
- Assess if you require a complete overhaul or focused updates.
- Clearly communicate your priorities to contractors for optimal craftsmanship.
- Answering these questions early will help streamline the project and minimize changes.
Furthermore, understanding the average recommendation to remodel kitchens every five years can guide your decisions regarding kitchen updates.
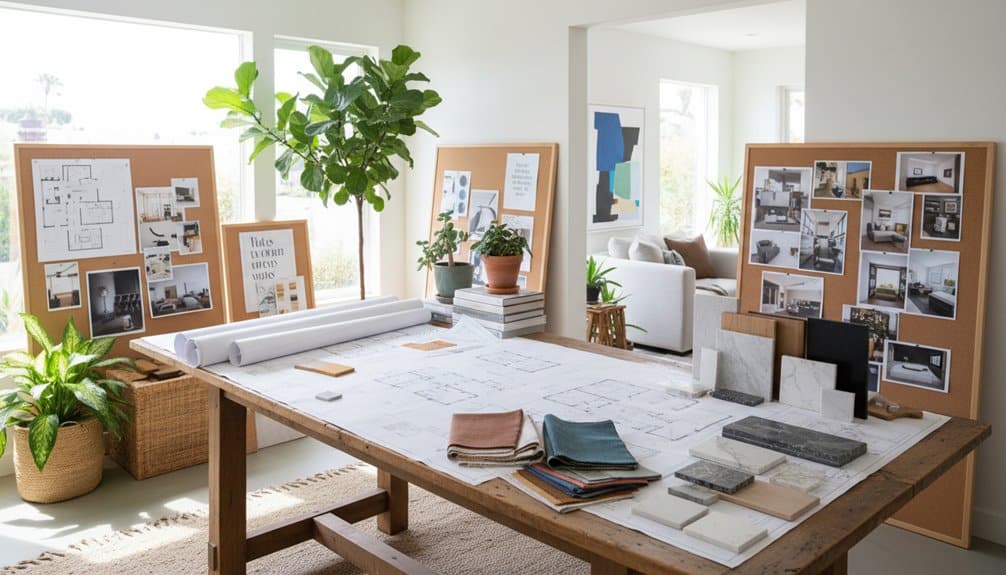
Planning, Design, and Contractor Selection
How can you effectively plan and design your home remodel?
To effectively plan and design your home remodel, begin with comprehensive consultations to define your project's scope and vision. Collaborate with a skilled contractor to develop detailed blueprints, typically within two weeks, while discussing essential elements such as design ideas, materials, and budget constraints.
Start your remodel with thorough consultations and collaborate with a contractor to create detailed blueprints tailored to your vision and budget.
- Ensure ongoing communication to align with your long-term goals.
- Research contractors with strong portfolios and positive client feedback.
- Verify their experience with the permitting process.
Establishing a solid foundation during this phase will lead to a smoother remodeling experience, minimizing surprises. Additionally, consider evaluating client referrals to gain insights into the reliability and skill of potential contractors.
For more insights on choosing the right contractor, see our guide on contractor selection.
Navigating the San Diego Permit Process

How can you navigate the San Diego permit process for home remodeling?
Understanding the San Diego permit process is crucial for a successful home renovation. To comply with local regulations, you’ll likely need permits for electrical, plumbing, or structural changes, particularly in kitchen and bathroom remodels.
The permitting timeline can range from 2 to 6 weeks, depending on the complexity of your project.
- Check if your home is in a historic district or coastal zone, as this may involve additional steps.
- Consider partnering with an experienced remodeling company to simplify document submissions and revisions. This can help ensure you meet the specific permit requirements for your type of project.
- Familiarize yourself with the specific permit requirements for your type of project.
To learn more about the specific permits you may need, see our guide on home renovation permits in San Diego.
Material Selection and Procurement
As you embark on your remodel journey, selecting the right finishes and fixtures is crucial to reflecting your unique style.
But how do you ensure a seamless procurement process amid potential supply chain challenges? Exploring local suppliers and backup options can be key to keeping your project on track.
What strategies can you implement to optimize your material selection?
Personalizing Material Choices
How can you personalize material choices during a home remodel?
Personalizing material choices in a home remodel is essential for achieving a unique aesthetic and ensuring long-lasting functionality. Start by selecting materials that resonate with your personal style while considering their durability and comfort.
Collaborate with local suppliers to minimize shipping costs and speed up delivery times, which can alleviate potential supply chain delays.
- Begin your selection process early to avoid last-minute decisions.
- Consult with experienced contractors to ensure your choices meet design and functional needs.
- Consider eco-friendly options to enhance sustainability in your remodel.
Navigating Supply Chain Challenges
How can you effectively navigate supply chain challenges during a remodel?
Navigating supply chain issues is essential for a smooth whole-home remodel. To mitigate delays caused by material shortages, consider collaborating with local suppliers. This often leads to quicker access to required materials and more reliable delivery schedules.
To ensure project continuity, you might want to:
- Research local suppliers early on.
- Prepare backup options for critical materials.
- Coordinate procurement timing with your construction schedule.
By taking these proactive steps, you can maintain momentum in your remodeling project.
For more insights on optimizing your material choices, see our guide on smart sourcing strategies.
Early Selection Strategies
How can early selection of materials streamline your remodeling project?
The early selection of materials is essential for a smooth home remodeling process, especially in San Diego. By finalizing your choices four to six weeks ahead of time, you can mitigate potential delays caused by supply chain issues.
Opting for local suppliers can further expedite access to needed items.
- Research and choose your materials early.
- Create backup plans for your preferred finishes.
- Communicate material timelines clearly with your contractor.
By taking these proactive steps, you’ll enhance your remodeling experience and keep your project on track.
For more tips on managing your remodeling timeline, see our guide on efficient project planning.
Demolition and Site Preparation
How does demolition kickstart a home remodel?
Demolition is the pivotal first step in your whole-home remodel, laying the groundwork for all subsequent enhancements. During this vital phase, expert teams efficiently remove outdated fixtures and finishes, preparing your living space for a remarkable transformation.
Demolition sets the stage for transformation, clearing out the old to make way for your home's stunning new beginnings.
Site preparation involves safeguarding unaffected areas and reinforcing foundational elements, all while complying with local regulations.
In addition to physical changes, this process can evoke a range of emotions, including:
- Excitement as you witness tangible progress.
- Anxiety regarding temporary disruptions to your daily routine.
- Relief knowing that seasoned professionals are managing every detail according to standards.
As you navigate these feelings, you can look forward to the next stages of your remodel. For more insights on what to expect, see our guide on managing emotions during renovations.
Construction and Core Remodeling Work
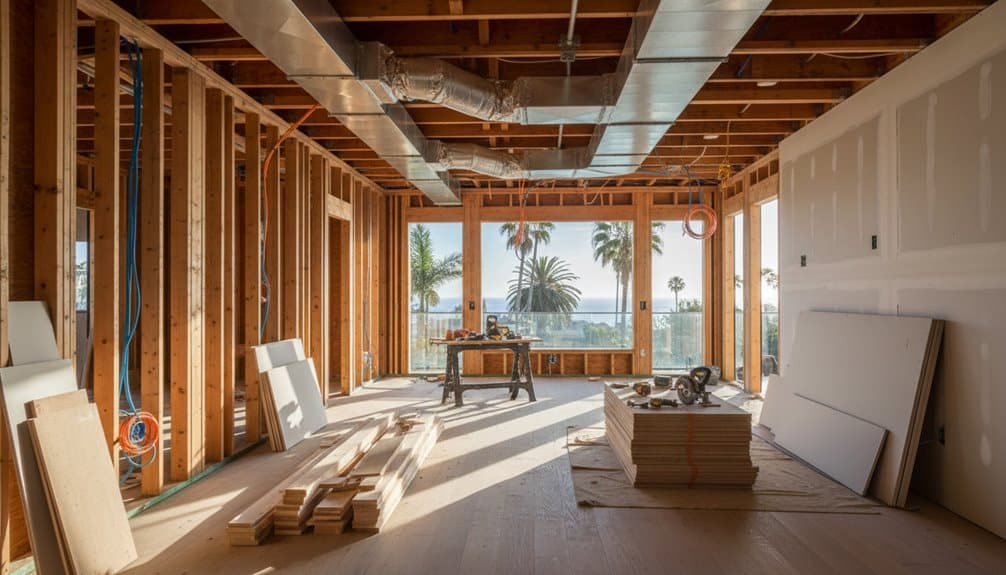
How does the construction and core remodeling process unfold?
Once your home is prepared, the construction and core remodeling can commence. This phase primarily involves tasks such as removing outdated fixtures, upgrading electrical and plumbing systems, and strengthening structural components like the foundation and framing.
Typically, this stage lasts between 2 to 6 months, depending on the project's complexity.
Key steps include:
- Removing old materials
- Installing insulation and drywall
- Selecting materials for finishes
Effective communication with your contractor is essential to mitigate delays caused by scheduling or weather.
After structural work wraps up, you can focus on the final touches. For more tips on selecting materials, check out our guide on home design essentials.
Final Touches, Inspections, and Project Handover
As your whole-home remodel nears completion with final touches and inspections, it's crucial to remain engaged in the process.
Are you prepared for the upcoming project handover and what it entails?
Understanding the importance of these final steps ensures everything aligns with your vision for your new space.
Completing Finishing Touches
How can you ensure your home remodel's finishing touches are perfect?
As your home remodel approaches the finishing touches phase, it's crucial to collaborate closely with your contractors. This stage typically spans 1-2 weeks and involves installing hardware, adding accessories, and executing final paint touch-ups to create a polished look.
Staying attentive to small details during this time can significantly enhance the overall aesthetic of your space.
- Conduct a final walkthrough to identify any incomplete tasks.
- Communicate clearly with your contractors about your vision.
- Make minor adjustments to ensure every aspect aligns with your expectations.
By prioritizing these steps, you can transform your house into a dream home.
To learn more about maximizing your renovation experience, check out our guide on essential home remodeling tips.
Passing Final Inspections
How can homeowners prepare for final inspections after a remodel?
To ensure a smooth final inspection process, homeowners should first familiarize themselves with local building codes and safety regulations. This knowledge allows you to anticipate what inspectors will look for, reducing the chances of unexpected adjustments.
Additionally, conduct a pre-inspection walkthrough with your contractor to identify and address any potential issues beforehand.
- Review all work completed to ensure compliance with specifications.
- Gather all necessary documentation, such as permits and warranties.
- Be ready to schedule any required follow-up visits promptly.
Once you’ve addressed these areas, you’ll be one step closer to enjoying your beautifully remodeled home.
For more tips on home improvements, see our guide on maximizing renovation efficiency.
Conclusion
As you embark on your San Diego whole-home remodel, understanding the month-by-month process is essential to realizing your dream space. By applying the strategies outlined in this article, you can manage expectations and effectively tackle challenges, ensuring a smoother renovation journey. Embracing these insights not only enhances your project management skills but also helps create a home that truly reflects your vision. For more helpful tips and guidance on navigating your remodel, consider exploring additional resources or related guides that can assist you in taking that exciting first step toward your dream home.
Does Your Bathroom Need A Remodel?
Bathrooms are some of the most ‘delicate’ spaces in any home. Unlike other rooms that can be allowed to age a little bit, bathrooms have to be in good shape all year round because they are the hygiene headquarters of any given house. The kitchen holds the same position too. However, let’s focus on the bathroom for now. How do you tell that your bathroom needs some work? Here are a few pointers.
Mold infestation
Bathrooms are highly susceptible to mold due to the water and moisture that is constantly circulating and flowing around its surfaces. The walls and ceilings are especially affected. And because most bathrooms are light in color, the mold stands out like a sore thumb creating an eyesore for all that visit. If this is the case with your bathroom, a fresh coat of paint is past due. Not only that, you may also need to improve air circulation/ventilation in there by maybe installing a larger window.
Cracked, dirty or stained tiles
Most bathrooms are covered in tiles. There are tiles on the floor and there are tiles on the walls. Over time, tiles will show signs of age (or neglect). And it does get to a point where the only solution is to replace them. If your tiles are broken, cracked, or stained, you most probably need to retile the bathroom. The same applies if the grouting on your tiles is chipped, stained or missing in whole. Retiling your bathroom not only gives it a facelift, it also helps prevent water damage behind the walls and underneath the floor.
Poor lighting
No one enjoys taking a shower or a bath in a poorly-lit space. For one, everyone needs good visibility when taking a bath. Secondly, lighting is very important if the bathroom is to be kept clean. And third, great lighting simply makes a bathroom look elegant and chic. If your bathroom has just a single lonely dim bulb or no natural light whatsoever then consider installing modern lighting, improving the flow of natural light, and probably changing the wall décor to allow better light reflection.
Leaky faucets, pipes, shower or shower base
Plumbing is critical for a bathroom. The moment pipes and faucets start to fail the bathroom starts to get dysfunctional. And you don’t want your bathroom getting dysfunctional, whether it’s the toilet, the faucet, or the shower system. Not only can it get unhygienic, messy, and wasteful on water, it can also lead to water damage, rot, mold, algae, termites, and other related issues.
Outdated features
Last but not least, your bathroom needs a remodeling if it has outdated features. It’s very important to keep your décor updated with the times. And in 2019 some features are just too drab to have anymore. For example, if your bathroom still has glass bathroom tiles or that 1960’s green wall paint then it’s time to change it. A bright contemporary theme will immediately transform your space and make you want to spend more time in there.
Say no more when it comes to bathroom remodeling San Diego. Creative Design and Build has got you covered. We will help you choose the right style, source materials, and we’ll manage the entire project from A to Z!