Aging-in-Place Bathroom Design for San Diego Homes
As we age, the simple act of using the bathroom can become a daunting challenge. Did you know that nearly one in three seniors experience a fall each year, often occurring in the bathroom? For homeowners in San Diego, the solution lies in thoughtful aging-in-place bathroom design. This article is tailored for seniors, caregivers, and family members looking to create a safe, comfortable, and accessible bathroom environment. It addresses the core challenge of ensuring safety and ease of use while maintaining independence. You'll discover essential features such as grab bars, non-slip flooring, and walk-in showers that enhance safety. We’ll also explore the importance of lighting, the benefits of raised toilet seats, and lever-style faucets for daily convenience. Additionally, we’ll discuss how to widen doorways and integrate smart storage solutions. By the end, you'll have a comprehensive roadmap to transform your bathroom into a sanctuary that supports aging in place.
Understanding the Needs of Aging Homeowners
How can bathroom modifications enhance safety for aging homeowners?
As we age, our physical abilities can diminish, making everyday activities, like using the bathroom, increasingly difficult and potentially hazardous.
Implementing bathroom modifications is essential for promoting safety and independence. Key features such as grab bars, non-slip flooring, and walk-in tubs can significantly reduce the risk of falls while ensuring ease of access.
Grab bars, non-slip flooring, and walk-in tubs are vital bathroom modifications that enhance safety and independence for aging homeowners.
- Install grab bars near the toilet and in the shower.
- Opt for non-slip mats or flooring to prevent accidents.
- Consider a walk-in tub or a shower with a low threshold.
By focusing on these enhancements, you create a more secure environment that supports aging in place. Additionally, working with professionals who specialize in accessibility modifications can provide tailored solutions to meet specific needs.
For further tips on home safety, see our guide on universal design principles.
Key Safety Features for Senior-Friendly Bathrooms
When updating a bathroom for aging in place, focusing on essential safety upgrades like grab bars and non-slip flooring is crucial for preventing slips and enhancing accessibility. But how can you further improve the space to support daily routines? Exploring thoughtful lighting and toilet height adjustments can lead to even greater comfort and safety. Additionally, ensuring adequate lighting can help prevent slips and falls, further enhancing safety in the bathroom.
Essential Bathroom Safety Upgrades
How can bathroom safety be improved for seniors?
Implementing specific upgrades can enhance bathroom safety for seniors, significantly lowering the risk of accidents. Start by installing grab bars near the toilet and in the shower; these solid supports aid in maintaining balance and mobility.
Replacing a traditional bathtub with a walk-in shower can also mitigate tripping hazards associated with high tub walls.
- Choose non-slip flooring to provide secure footing, even when wet.
- Ensure proper lighting for better visibility during nighttime trips.
- Consider adding a raised toilet seat for easier sitting and standing.
These adjustments create a safer bathroom environment. Additionally, it’s important to assess plumbing works to ensure that water flow and fixtures are optimized for senior use. For more comprehensive tips, check out our guide on senior-friendly home modifications.
Slip-Prevention and Accessibility
How can you enhance bathroom safety for seniors?
To create a safer bathroom environment for seniors, prioritize features that prevent slips and improve accessibility.
Start by installing grab bars near the toilet and shower, offering essential support. Non-slip flooring is also crucial, as it provides better traction compared to traditional surfaces, reducing fall risks.
Consider adding a raised toilet seat to assist those with limited mobility, making sitting and standing easier.
Additionally, ensure the bathroom is well-lit to enhance visibility, particularly during nighttime use.
Implementing these features will foster a safer, more navigable space.
For further insights on enhancing home safety, explore our guide on fall prevention strategies.
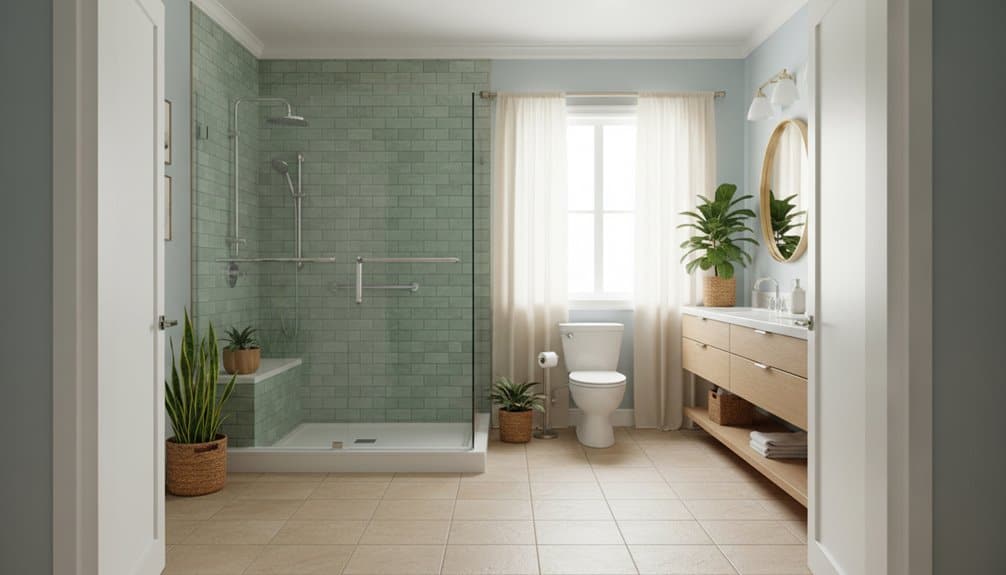
Accessible Showers and Bathtub Alternatives

How can accessible showers enhance safety for seniors?
Accessible showers significantly improve safety for seniors by eliminating common bathroom hazards. Features like no-step entries and curbless designs reduce the risk of trips and falls, allowing for easier access.
Furthermore, the inclusion of grab bars and handheld showerheads provides essential support and flexibility, catering to the needs of those with limited mobility.
- Install grab bars for added stability.
- Opt for handheld showerheads for better control.
- Choose slip-resistant flooring for extra safety.
These modifications create a more secure bathing environment, promoting independence and comfort.
To learn more about creating a safe bathroom space, see our guide on aging-in-place renovations.
Flooring, Lighting, and Slip-Prevention Strategies
When planning a bathroom for aging in place, it's crucial to prioritize slip-resistant flooring and effective lighting for safety.
But what other features can enhance accessibility and comfort in this essential space?
Exploring additional strategies can further ensure a functional environment that promotes independence.
Non-Slip Flooring Options
How can you choose non-slip flooring for a safer bathroom?
Selecting non-slip flooring for a bathroom is essential for enhancing safety, especially for those aging in place. Options like textured vinyl and rubber flooring provide excellent grip while being easy to maintain.
Additionally, cork flooring offers a softer surface that's naturally slip-resistant, making it a comfortable choice.
- Consider using non-slip backed area rugs for extra stability.
- Regularly maintain the floors to address spills promptly.
- Evaluate the flooring materials to ensure durability and water resistance.
By prioritizing these factors, you can significantly reduce the risk of slips and falls in your bathroom.
For more tips on creating a safe home environment, see our guide on home safety modifications.
Enhanced Bathroom Lighting
How can enhanced bathroom lighting improve safety for aging individuals?
Enhanced bathroom lighting significantly boosts safety for seniors by improving visibility in high-risk areas like showers and toilets.
Bright LED lights can eliminate dark spots, making it easier to identify obstacles and reducing the likelihood of slips and falls.
Installing motion-activated lights ensures that individuals never have to fumble for a switch in the dark.
- Use wall sconces or recessed fixtures to create even illumination.
- Opt for energy-efficient bulbs to maintain brightness without high energy costs.
- Consider adjustable lighting to accommodate varying needs throughout the day.
By combining superior lighting with non-slip flooring, you create a safer, more comfortable bathroom environment.
For more tips on creating a senior-friendly home, see our guide on aging in place.
Optimizing Bathroom Layout for Mobility and Independence
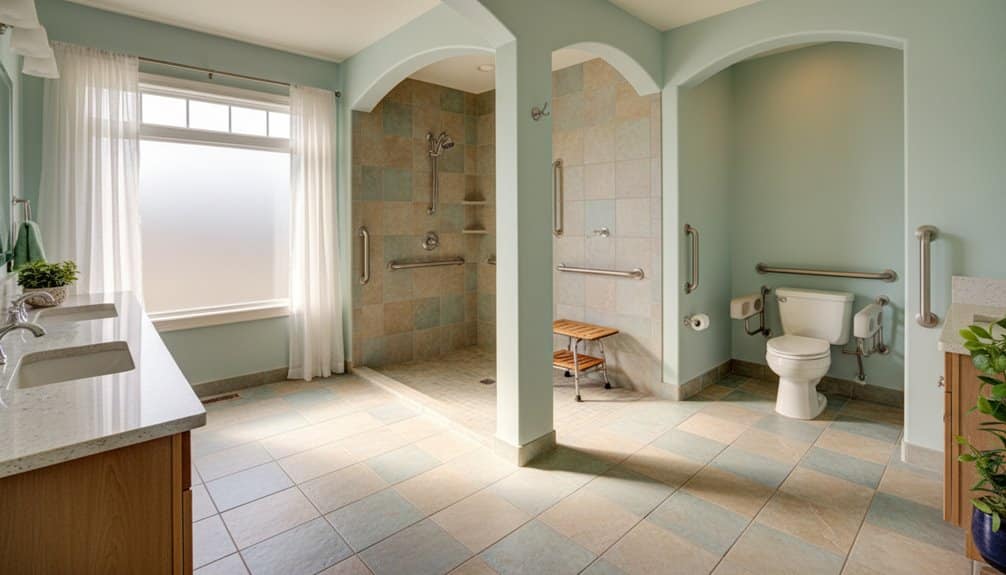
How can you optimize a bathroom layout for mobility and independence?
To create a bathroom that fosters independence and enhances mobility, focus on optimizing the layout to eliminate barriers and improve accessibility. Start by ensuring doorways are at least 36 inches wide to allow easy passage for mobility aids like wheelchairs and walkers.
Incorporating a no-step shower instead of a traditional tub minimizes tripping hazards, making entry safer.
- Install sturdy grab bars near the toilet and shower to provide essential support.
- Use slip-resistant flooring to prevent accidents in wet conditions.
These design choices significantly enhance safety and promote a sense of autonomy. For further insights, see our guide on accessible home modifications.
Storage Solutions and Easy-to-Use Fixtures
How can you enhance storage and fixture usability in an aging-in-place bathroom?
When designing an aging-in-place bathroom, prioritize effective storage solutions and user-friendly fixtures to promote independence.
Built-in cabinets and vertical shelving are essential for maximizing space, ensuring that daily essentials are easily accessible while minimizing clutter. Smart storage options like pull-out drawers enhance organization, making it simpler to keep toiletries within reach.
Additionally, opt for easy-to-use fixtures such as lever-style faucets and touch-activated controls, which cater to seniors with limited dexterity.
Wall-mounted sinks and lower countertops further improve accessibility, creating a comfortable workspace for daily routines.
For more tips on creating a senior-friendly bathroom, check out our guide on accessible design solutions.
Choosing Professional Remodeling Services in San Diego
How can you find reputable remodeling services for an aging-in-place bathroom in San Diego?
Finding the right professionals for your aging-in-place bathroom remodel involves focusing on contractors who are both licensed and insured, ensuring they provide quality and accountable work.
Prioritize licensed and insured contractors to guarantee quality workmanship and accountability for your aging-in-place bathroom remodel.
Look specifically for Certified Aging-in-Place Specialists (CAPS), who are trained to design safe and accessible spaces for seniors.
- Always request to see a portfolio of past projects.
- Check online reviews and references for insights into their reliability.
- Take advantage of free consultations many services offer to discuss your specific needs.
By following these steps, you can confidently select a contractor who'll help create a functional and aesthetically pleasing bathroom space.
For further assistance, see our guide on accessibility features for bathrooms.
Conclusion
In conclusion, an aging-in-place bathroom remodel is essential for enhancing safety and comfort in San Diego homes. By implementing accessible designs and slip-resistant features, you can significantly improve your daily living experience, allowing for greater independence and peace of mind. Embracing these strategies not only benefits your current lifestyle but also prepares your home for future needs. Consider exploring more tips on creating a senior-friendly space or diving into related guides that detail effective renovations. Your journey toward a well-designed, aging-in-place bathroom is just beginning!
Walk-In Shower Installations
Installing a walk-in shower requires careful planning and attention to key details. You'll need to measure your bathroom dimensions, consider plumbing requirements, and select appropriate materials that match your style and budget. Modern walk-in showers typically cost between $3,500 and $12,000, depending on whether you choose prefab or custom options. Essential elements include non-slip flooring, proper drainage installation, and strategic placement of fixtures for peak flow. Safety features like grab bars and adequate lighting guarantee comfortable use, while design choices such as glass panels and corner installations maximize space. Understanding the complete process will help you make informed decisions for your project.
Planning Your Walk-In Shower Space

When planning a walk-in shower installation, careful consideration of your bathroom's layout serves as the foundation for a successful project. You'll need to measure your bathroom's dimensions and evaluate how the shower will interact with existing fixtures like toilets and sinks. This assessment guarantees ideal shower accessibility while maintaining a harmonious flow throughout the space.
Your focus should extend beyond basic measurements to include design aesthetics that complement your bathroom's overall style. Consider how you'll move within the shower space and access toiletries.
Don't forget to account for specific constraints your bathroom may present, such as awkward corners or limited floor space. By balancing practical requirements with visual appeal, you'll create a shower installation that's both functional and aesthetically pleasing. Additionally, incorporating safety features can further enhance the usability of your walk-in shower, ensuring a safe and enjoyable experience for all users.
Essential Safety Features
Safety features serve as the cornerstone of any well-designed walk-in shower installation. When you're planning your shower, following safety regulations and guaranteeing user accessibility should be your top priorities.
You'll need to incorporate essential elements that protect everyone who uses the space.
Key safety features you'll want to include:
- Non-slip flooring with textured surfaces to prevent falls
- Strategically placed grab bars for support during entry and exit
- Built-in or portable seating that meets ADA compliance
- Adequate lighting and clear pathways to minimize accidents
Don't forget to maintain these safety features regularly.
You'll want to clean surfaces weekly to prevent soap scum buildup, check grab bar stability monthly, and guarantee all lighting fixtures are working properly.
These precautions won't just meet safety standards - they'll provide peace of mind for years to come.
Plumbing and Drainage Requirements

Proper plumbing and drainage setup forms the foundation of a successful walk-in shower installation.
You'll need to follow strict plumbing codes when positioning your supply lines, which should be 8 inches apart horizontally, while the shower arm installation requires an 80-inch height from the floor. Your drainage systems must be precisely configured, with the drain hole positioned 14 inches from the back wall framing.
For ideal drainage, you'll want to guarantee your subfloor preparation is meticulous.
Install 3/4-inch plywood sections between the joists, and don't forget to mark and cut the drain opening carefully. When setting up the shower pan, you'll need to secure it with thin-set mortar and verify it's completely level.
Remember to waterproof the entire assembly, as this critical step prevents future water damage.
Design Options and Materials
When you're planning your walk-in shower, you'll need to take into account three key design elements: glass panel configurations, material selections, and space-maximizing layouts.
Your choice of glass panels, whether frameless or partially framed, will greatly impact both the shower's aesthetics and functionality, while your material selections can range from classic porcelain tiles to modern solid surfaces.
Smart layout decisions, such as corner installations or wet room designs, will help you make the most of your available space while creating a stunning focal point in your bathroom.
Glass Panel Configurations
Modern walk-in showers offer an array of glass panel configurations to match your style and space requirements.
Whether you're looking for sleek panel styles or functional door types, you'll find options that transform your bathroom into a contemporary oasis.
Choose from these popular configurations to enhance your shower space:
- Single door designs that create an upscale look while maximizing narrow spaces
- Inline door and panel combinations for versatile three-wall installations
- 90-degree enclosures featuring two glass walls for elegant corner showers
- Rolling barn-style doors that solve clearance challenges while adding visual interest
You'll find that each configuration brings its own advantages, from space optimization to aesthetic appeal.
Consider your bathroom's layout and daily usage patterns when selecting the perfect glass panel arrangement for your walk-in shower installation.
Material Selection Guide
Selecting the right materials for your walk-in shower can dramatically impact both its functionality and visual appeal.
When exploring current design trends, you'll find that tile pros include exceptional durability and endless style options, though installation can be challenging.
While acrylic cons include potential scratching and lower durability, its affordability and easy maintenance make it a practical choice for many homeowners.
Fiberglass benefits include lightweight construction and simple installation, making it an attractive option for budget-conscious renovations.
If you're looking for a premium solution, solid surface materials offer outstanding durability and resistance to mold.
For maintenance tips, remember that both acrylic and fiberglass require gentle cleaners, while tile and solid surface materials can withstand more rigorous cleaning routines.
Consider your budget, lifestyle, and long-term maintenance preferences when making your final selection.
Space-Maximizing Layout Options
Maximizing space in your bathroom begins with strategic walk-in shower placement and smart design choices.
When considering minimalist designs, you'll find that corner and alcove installations offer efficient solutions while maintaining style and functionality. Glass partitions, as shower curtain alternatives, create an open feel and allow natural light to flow throughout the space.
Consider these space-maximizing layout options:
- Corner showers with curved or triangular frames to utilize awkward spaces
- Vertical tile patterns to create the illusion of height
- Wall-mounted fixtures to reduce visual obstructions
- Glass dividers instead of full enclosures for an airy feel
You can further enhance your layout by positioning the shower near windows or skylights, incorporating hanging vanities, and using strategic lighting to brighten the space. Incorporating eco-friendly materials can also elevate your design while promoting sustainability.
These choices work together to create a bathroom that feels larger and more inviting.
Small Bathroom Layout Solutions

When planning your small bathroom's layout, you'll find that corner walk-in showers offer an excellent way to maximize limited floor space while maintaining a modern aesthetic. Your vertical storage options, including floating shelves and recessed cabinets, can transform unused wall areas into practical storage solutions without compromising walkways. Strategic placement of fixtures, with the shower and toilet along one wall and the vanity opposite, creates an efficient traffic flow that makes your compact bathroom feel more spacious and functional. Additionally, incorporating space-saving features can enhance both the style and utility of your bathroom.
Maximize Corner Space
Smart corner shower designs serve as the cornerstone of space-efficient bathroom layouts. Through strategic corner utilization, you'll transform underused spaces into functional showering areas while maintaining an open feel.
Space optimization becomes effortless when you incorporate neo-angle designs with clear glass panels and modern fixtures.
Consider these space-maximizing features for your corner shower:
- Built-in recessed shelving for clutter-free storage
- Sliding glass doors that eliminate swing-space requirements
- Frameless glass enclosures to create visual openness
- Compact fixtures with sleek profiles for modern appeal
You'll enhance accessibility by adding grab bars and built-in seating, making your corner shower both practical and comfortable. Additionally, integrating smart technology can elevate the overall experience and convenience of your showering routine.
With custom tiling options and strategic lighting placement, you can create a personalized corner shower that feels spacious while fitting perfectly in your bathroom's layout.
Vertical Storage Solutions
Vertical storage transforms cramped bathrooms into well-organized spaces that maximize every inch from floor to ceiling.
You'll discover endless possibilities for bathroom organization, from wall-mounted shelves for toiletries to over-the-toilet storage units that utilize otherwise wasted space.
Consider installing floating shelves for a modern look, or opt for ladder shelves that combine style with functionality.
Make the most of your vertical space by incorporating tall, slim cabinets in corners and custom-built cabinetry that extends to the ceiling.
You can enhance your storage options with pull-out organizers and stackable bins under the sink.
For added versatility, try installing pegboard walls with adjustable shelves or tucking a tiered cart into an unused corner. Utilizing under-sink storage can also be an effective way to keep your essentials organized and easily accessible.
These solutions don't just save space—they'll keep your essentials organized and easily accessible.
Smart Fixture Placement
Beyond maximizing vertical space, thoughtful fixture placement can transform even the smallest bathroom into a functional oasis.
Smart placement strategies help create clear pathways and distinct zones while maintaining an open feel. You'll want to focus on fixture organization that maximizes your bathroom's layout potential.
- Position your walk-in shower in a corner to optimize space utilization
- Install the toilet and shower on one wall to create a streamlined design
- Place your vanity on the opposite wall to maintain clear walkways
- Consider a wet room design for an open, spacious feel
When you're planning your layout, remember that strategic fixture placement isn't just about fitting everything in - it's about creating a comfortable flow that makes your bathroom feel larger and more inviting.
You'll find that well-planned spacing between fixtures enhances both functionality and aesthetics.
Professional Installation Best Practices
Proper installation of a walk-in shower requires careful planning and attention to detail from start to finish. Your first steps should focus on advanced installation techniques, including precise measurements and thorough waterproofing methods to protect your investment.
You'll need to carefully assess the space and verify that your plumbing setup can accommodate the new shower.
When you're ready to begin, start with proper framing and installation of cement board or waterproof drywall. Make sure you're using appropriate waterproofing materials for both the walls and floor.
After securing the shower base, you'll need to carefully install wall panels and connect all plumbing components.
Don't forget to perform a flood test to check for leaks and verify that all seams are properly sealed before completing the project.
Budget and Cost Breakdown

Once you've mastered the installation process, understanding the financial aspects of a walk-in shower project will help you plan effectively.
When comparing cost options, you'll find that the national average hovers around $7,500, but prices can range from $3,170 to $11,495 depending on your choices.
Here are essential budgeting tips to ponder:
- Custom showers cost $6,000-$12,000, while prefab options run $3,500-$8,500
- Materials make up 91.5% of your total budget, with labor at 8.5%
- Tile installation ranges from $2-$17 per square foot, offering flexible price points
- Glass doors can greatly impact your budget, ranging from $300-$2,500
Remember that your location, chosen materials, and project complexity will influence the final cost.
Think about getting multiple quotes and exploring different material options to find the best balance between quality and affordability.
Conclusion
With 82% of homeowners reporting increased property values after installing walk-in showers, you're making a smart investment in your home's future. You'll find that proper planning, attention to safety features, and careful material selection will create a beautiful, functional space that serves you well for years to come. Whether you choose professional installation or tackle it as a DIY project, your new walk-in shower will transform your daily routine and enhance your home's appeal.